![ITONICS-Logo-Night-Blue-2021.svg]](https://www.itonics-innovation.com/hubfs/ITONICS-Logo-Night-Blue-2021.svg)
This guide describes the changes between the V1 process builder and the workflow builder V2. As of 14 October 2026, the new workflow builder is rolled out to all organizations, and phase tags are automatically migrated to Lifecycles (see section 5). Organizations that were moved to the new workflow builder on 14 September 2026 had their phase tags removed at that time; these phase tags cannot be migrated to Lifecycles retroactively, but admins can set up a lifecycle manually in the Lifecycle tab of the element type configuration. The behavior of the new workflow builder is described in Workflow Builder — Create, manage and apply workflows in ITONICS.
Where today's workflow (process) builder V1 behaviour is described, V1 names are used: Process Configuration for the admin surface and the Process tab for the user surface. V2 names are used everywhere else.
🗺️ 1. What became what
|
V1 concept |
V2 equivalent |
Migration |
|---|---|---|
|
Process |
Workflow |
Auto-migrated |
|
Process Configuration (admin) |
Workflow builder |
Auto-migrated |
|
Process tab (element detail page) |
Actions section on the element detail page |
Auto-migrated |
|
Action Step |
No direct equivalent – the step layer is removed |
- |
|
Action |
Manual form node |
Auto-migrated |
|
Form (inside an action) |
Form (configured on a Manual form node) |
Auto-migrated |
|
Gate |
Manual review node |
Auto-migrated |
|
Element conversion (toggle on a gate) |
Convert element automation node |
Auto-migrated: Element conversion moves from a pop-up at the gate to a named path in the workflow — reviewers choose "Convert to X" directly in the flow, making the decision explicit and traceable. |
|
E-mail notification (toggle on an action or a gate) |
Send email automation node |
Auto-migrated |
|
Phase tag |
Lifecycle on the element type – one lifecycle per workflow |
Auto-migrated (see section 5) |
|
Manage Phase Order (workflow settings menu) |
Phase order is set in the lifecycle configuration |
Auto-migrated (see section 5) |
|
Criteria (on the start node) |
Matching elements start trigger |
Auto-migrated |
|
Note |
Note – remains unchanged |
Auto-migrated |
📝 2. Steps and actions become manual form nodes
In V1, one thing a user does is assembled from three nested objects: an Action Step holds one or more Actions, and each action holds its Forms. In V2 that collapses into one Manual form node.
The migration is per action, not per step: every V1 action becomes a single Manual form node. A step that contained three actions therefore becomes three Manual form nodes, connected in sequence.
Example:
Step “Decision” with actions “Set Description” and “Assign Users” becomes two manual form nodes “Decision - Set Description” and “Decision - “Assign Users”. Steps with a single action keep the step title.
|
V1 configuration |
Where it lands in V2 |
|---|---|
|
Step title, step description |
No longer a separate object — each resulting node carries its own title |
|
Step phase tag |
Becomes an option of the workflow's lifecycle; the phase change becomes an Update element node (see section 5) |
|
Action title |
Node title, and the label of its action button |
|
Action assignees |
Permissions / Assignees on the node |
|
Action e-mail notification + custom text |
Extracted into a separate Send email node (see section 6) before the Manual form node (“Form ready”), with a defined notification message taken over. |
|
Form title, sections, ratings |
The form configured on the node |
What the node adds
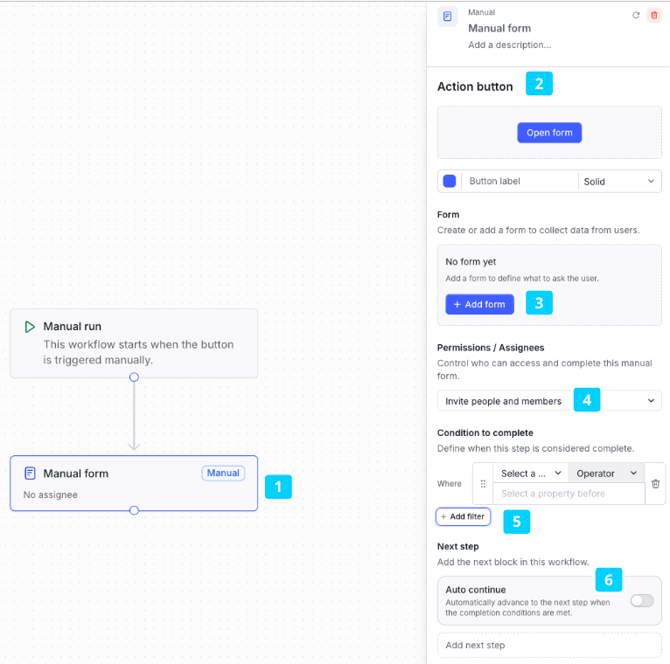
Beyond what the action carried, a Manual form node (1) also configures the action button itself (2) (label, colour, and appearance — solid, subtle or ghost), a condition to complete (5), an auto-continue (6) toggle, and its own next-node selection. Forms (3) gain two block types alongside Section and Rating: Columns, which lay blocks out side by side, and Information block, which carries explanatory text for the person filling the form in.
What the user sees instead
In V1 the user opens the Process tab, fills the form, clicks Submit action to save, then clicks Complete to submit the step for review. In V2 the user clicks the action button on the Actions section on the element, which opens a drawer holding the form (edits autosave).
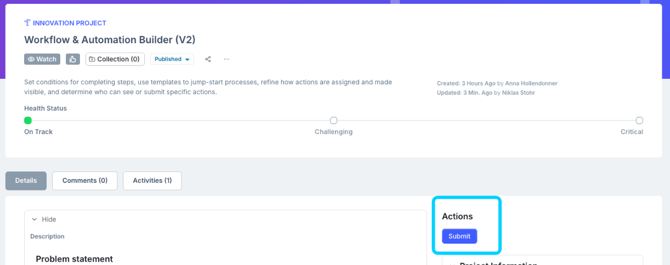
One button reads Save while the condition to complete is unmet, and Save & Next once it is met or if no condition is set. Submitting writes the values to the element and advances the workflow.
Important notes:
- The three-layer nesting is gone, so there is no longer a container that groups several user actions under one heading. Grouping is expressed by the order of the nodes on the canvas.
- Deleting a V1 action deleted its forms, and deleting a step deleted its actions and their forms. In V2 a form belongs to the node it is configured on.
✅ 3. Gates become manual review nodes
Every V1 Gate becomes a single Manual review node. The decision model carries over almost unchanged; two things that used to be toggles on the gate become nodes of their own. Set Reviewers are carried over.
|
V1 gate configuration |
Where it lands in V2 |
|---|---|
|
Gate title, description |
Node title and description |
|
Reviewers |
Permissions / Reviewers on the node |
|
Validate checks – no minimum / at least x approvals / all reviewers must approve |
Validate checks, unchanged |
|
Allow element conversion – destination type, archive original, copy comments and relations |
Extracted into a Convert element node. In v1, the user chose Convert or Continue at the gate. In v2 each conversion rule is its own branch, and both the conversion and the continue path run after the Manual review (gate) is approved. |
|
Receive e-mail notification + custom text |
Extracted into a Send email node (see section 6) before the Manual review node (“Gate ready”), with a defined notification message taken over. |
What the node adds
A configurable action button, a condition to complete that can gate Validate behind criteria beyond the approval count — "approvals > 2 AND budget > 1M" — and an auto-continue toggle, available where the review has a single next node.
What the reviewer sees instead
V1 offers Approve, revoke approval, and Request changes with a mandatory comment, with Validate becoming active once enough approvals are in and the validating expert choosing the next step.
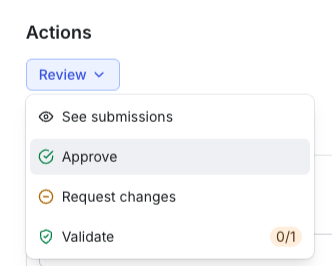
V2 opens a review drawer built as a split button: See submissions, plus Fast approve, Fast request changes and Validate. The drawer shows who has approved, who is still pending, and any open change requests with their comments. It shows the values the submitter entered, with an Edit that opens the form so a reviewer can correct a small error in place rather than sending the whole thing back. Where the path forks after the review, the validating reviewer still chooses the branch on Validate.
Important notes:
- When Validate is unavailable, a popover on the button lists every unmet check – the approval count, the unmet conditions – so the reviewer can see what is missing. V1 gave no such explanation.
- In V1, a single gate could carry several conversion destinations. A V2 Convert element node carries one destination (e.g. can be combined with prior routing nodes to route into different conversion paths based on criteria).
📄 4. The Process tab becomes the Actions section
The Process tab is removed. Nothing replaces it as a tab.
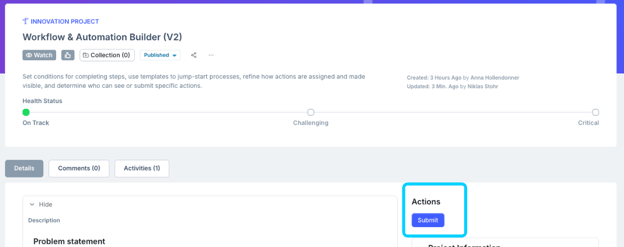
Instead, every action button from every workflow active on an element appears in a single Actions section on the element detail page. Clicking a button opens the matching drawer – the form, the review, or the URL – and submitting there both writes to the element and advances the workflow.
|
V1 Process tab |
V2 Actions section |
|---|---|
|
A separate tab on the element |
A section on the element detail page, beside the element's data (can be placed by the admin) |
|
Phase pearl chain at the top (Phase tags) |
Lifecycle display on the element – auto-migrated from the phase tags (see section 5) |
|
The configured form, inline in the tab |
A drawer opened from the action button |
|
"Complete to continue" and "next validation" sections |
Action buttons, enabled or disabled according to their conditions |
|
One process per element type per workspace |
Buttons from all workflows active on the element, together in one section |
|
Activities on the gate |
Moving to the Activities log |
Note: on migration, buttons are automatically named after their step ("Open <step title>"). They can be renamed to your liking afterward.
Beyond the detail page. The same buttons are available in the stack view, where the form and the review open as modals rather than drawers – same configuration, same flow, different container.
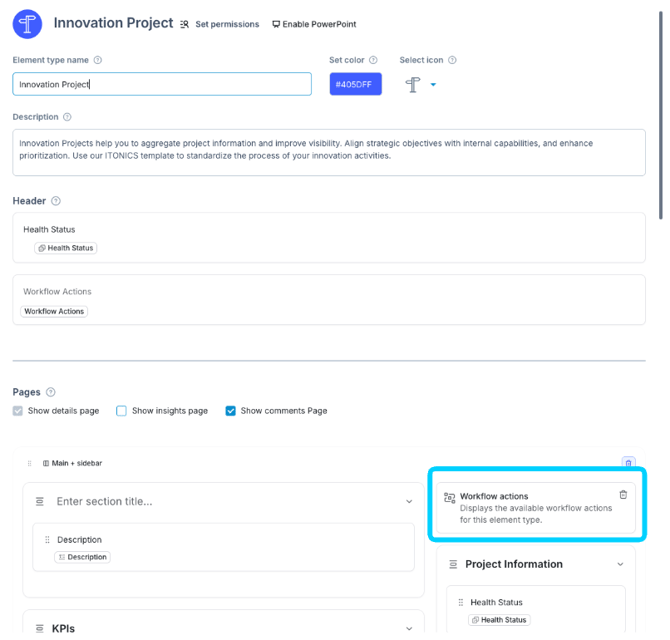
Admins can also move the buttons: a workflow action widget in the element configuration's form builder places them anywhere on the detail page rather than at the default top-right.
Where the history went
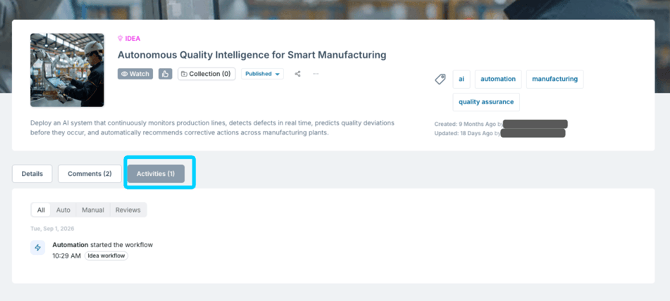
V1 tracked approvals, rejections, actions and comments in the actions and activity log on the gate. V2 carries an Activities log on the element detail page covering every workflow action on that element, automated and manual, filterable by All, Auto, Manual or Reviews, with each entry tagged by the workflow that produced it. Note: for now, only workflow-related property change are logged.
🎚️ 5. Phase tags become Lifecycles
Phases stop being a workflow object and become a Lifecycle on the element type. The migration is automatic: existing phase values, views, filters and the phase display on the element keep working, and admins do not need to do anything.
In V1, a phase tag is created inside the workflow builder, reused across steps as a tag and (potentially) across workflows. The phase tag carries a title and a colour, is attached to a step, and drives the pearl chain on the element. Its order is maintained through Manage Phase Order in the workflow settings menu. Technically, all phase tags live in one global phase tag field per space.
How phases are migrated
- Every V1 workflow that uses phase tags becomes one Lifecycle on its element type, named after the workflow. Five workflows with phases become five lifecycles.
- Each lifecycle is backed by a single-select dropdown property with the same name as the workflow. Its options are the phases of that workflow.
- The lifecycle's activation filter is copied from the workflow's start criteria, so the lifecycle shows on the same elements that followed the workflow before.
- Every element keeps the phase value it had in V1.
- Every V1 step that changed the phase gets an Update element node in V2 that sets the lifecycle property to the matching option, so phase progression works as before.
- Lifecycles live on the element type. If two element types used the same phases, each gets its own lifecycle with the same options.
Filters and views do not break
- The global phase tag field is migrated into one combined Lifecycles field (formerly shown as "Workflow phase" in filters). It holds the phases of all lifecycles in the space as a flat list, exactly like the V1 global phase tag list.
- Board, table and other views that filter on phase tags, e.g. to mimic a workflow on a board, keep working without reconfiguration.
|
V1 phase configuration |
Where it lands in V2 |
|---|---|
|
Phases of one workflow |
One lifecycle per workflow, named like the workflow |
|
Phase tag (title) |
Option of the lifecycle's dropdown property |
|
Global phase tag field (filters, views) |
Lifecycles field – a flat list of all lifecycle phases in the space |
|
Workflow start criteria (which elements show phases) |
Lifecycle activation filter |
|
Phase set on a step |
Update element node that sets the lifecycle property |
|
Manage Phase Order |
Option order in the lifecycle configuration |
|
Pearl chain on the element |
Lifecycle display on the element detail page |
What the admin sees instead
Lifecycles are configured in the new Lifecycle tab of the element type configuration:
- Create or edit a lifecycle by choosing a single-select dropdown property, either one bound to the element type or one from the workspace. A workspace property is bound to the element type automatically on save.
- Create a new property, or edit the selected one, directly from the lifecycle.
- Reorder, rename and hide phases. The order applies to the lifecycle only and does not change the option order in the property configuration.
- Pin further fields to the phase item, shown in a popover on the element. Text and rich text fields cannot be pinned.
- Set an activation filter that decides on which elements the lifecycle is shown.
What the user sees instead
The element detail page shows every lifecycle whose activation filter matches the element, and the user can switch between them. Pinned field values are shown per phase, with empty pinned fields grouped in a separate section.
Important notes:
- A property used in a lifecycle is locked to a single-select dropdown; its type cannot be changed.
- Properties and options used in a lifecycle or workflow cannot be deleted, to prevent broken workflows and views. New options can still be added. Note: this safeguard is being finalised.
- A phase change no longer has to sit on a step: an Update element node can set it at any point, including after an automation rather than after a user action.
- The existing "display as step" option for a dropdown pinned to the element header stays available. Admins who use it do not need to change anything and can switch to lifecycles at their own pace.
🔧 6. Other changes
E-mail notifications become nodes
- V1 carries an e-mail toggle with custom text on an action and on a gate, which fires when that action or gate needs performing.
- V2 removes both toggles and provides a Send email node with configurable recipients, subject and body, placed before the Manual Form and/or Review node in v2 (note: the system notification is kept when a manual review is validated). Recipients currently cover specific users and user search fields.
Two consequences worth knowing: in V1 no notification was sent when the same user was both action assignee and gate reviewer; and V1 tied a notification to the moment a task became due. In V2 the send happens when the workflow reaches the node.
Further, since now the “send email” node is separate, you can now review and change the default subjects without changing the list of assignees. Also: v2 now supports rich text in the email body; make use of it by updating your prior message.
Element conversion becomes a node
- V1 configures conversion as a toggle on a gate, with a destination element type, an archive-original toggle, a copy-comments-and-relations toggle, and the option to add further destinations.
- V2 provides a Convert element node carrying destination, archive and copy options, placed anywhere in the flow rather than only on a decision point.
Start-node criteria become the Matching elements trigger
- V1 filters which elements of a type follow the process using criteria on the start node, combined with AND/OR.
- V2 keeps this as the Matching elements start trigger, configured the same way — property, operator, value, combined with AND/OR. What changes is that it now sits alongside other trigger types rather than being the only way a workflow starts.
- If no criteria has been set, the new trigger is Always apply.
Linking is no longer one-in, one-out
- In V1 a step could be linked to one node in and one node out, and only a gate could lead to several paths.
- V2 removes that constraint: routing nodes fan out by design, a Manual review can lead to several next nodes, and each branch has its own connection point. The next node can also be chosen in the configuration panel rather than only by dragging on the canvas.
Shared steps and shared forms
- In V1, steps and their forms are shared across workflows: editing a form inside a shared step updates every workflow using that step, and the documented way to avoid this is to delete the step in the duplicated workflow and rebuild it from scratch.
- In V2 a form is configured on the node that uses it.
The workflow settings menu loses one entry
- Version History, Rename, Duplicate and Delete are unchanged.
- Manage Phase Order is removed – phase order is now set in the lifecycle configuration (see section 5).
Multi-destination gates
- V1 allows several conversion destinations on one gate; a V2 Convert element node takes one destination.
- In v2, a multi-conversion node is migrated and a popup decision shown on the gate exit which convert to conduct.
Multi-phase properties on one element type
- A customer running several workflows with phases on one element type gets one lifecycle per workflow, and users switch between them on the element. If several workflows are later configured to update the same lifecycle property, configure them cautiously so one workflow does not overwrite the progress of another.
Migration of running elements
- Forms submitted inside a not-yet-completed step in v1, are considered “submitted”.
- Example: In v1, a step with two forms – both are submitted but the step is not completed – become two submitted forms in v2.
- Those submissions show the element’s current field values:
- Each element receives one continuous workflow history logged in the Activities tab on the element detail page in v2. “Step completed” entries are deprecated and now considered a form completion.
📋 7. What has no V1 equivalent
These are not migrations – nothing in V1 maps onto them – but they are the reason several V1 workarounds are no longer necessary.
|
V2 capability |
The V1 workaround it removes |
|---|---|
|
Switch, Conditional run, Parallel run |
Building a near-duplicate workflow per department or scenario, because execution was linear |
|
Filter |
Guarding downstream work by convention rather than by configuration |
|
Update element, Change status, Delay |
Doing these by hand, or not at all |
|
Manual trigger, Manual URL |
Creating a form with no fields, or documenting an external step outside the platform |
|
Condition to complete, auto-continue |
Relying on the user to notice that a step was ready to advance |
|
Activity log with workflow-origin tags |
Reconstructing what happened from the gate log/activities alone |