2. Search for Content via the Search Bar
3. Filter — define a scope for each view
3.1. Special filters — current user
Always-on workspace search
The workspace search helps you quickly find and access elements within your current workspace. It matches your search terms against titles, descriptions, summaries, and related content to return relevant results and streamline navigation.
You can access the search from the sidebar in the Innovation OS or by using the keyboard shortcuts Cmd + K (Mac) or Ctrl + K (Windows).
The search also displays the last 10 elements you viewed, allowing you to reopen them quickly. From the results, you can open an element, open it in a new tab, copy a direct link for sharing, or run a PRISM ai analysis on the selected element for deeper insights.
Search for content via the search bar
The (view internal) search bar is located in all the tools of the Innovation OS in the top left corner [1]. It compares the search bar entry with the text contained in the titles, summaries, descriptions, and further reading links of elements stored in a particular workspace.
Note
- No search bar is currently available in Roadmap.
- The search bar in Insights serves a different purpose and does not look up elements within your system, but in the broader ITONICS Data lake.
- The search bar only works within a particular workspace and does not return results from other workspaces.
Start by adding the terms you want to search for, and the system will start automatically adjusting the displayed elements based on your search criteria.
To clear the search, remove your search term or click the x button at the end of the search bar.
Filter — define a scope for each view
Almost all ITONICS tools and visualizations are based on filters.The difference of one grid view to another grid view, is its filter.
The difference of a grid view to a radar view is its visualization, if the filter is the same.
This is the key to understanding the ITONICS Innovation OS
The filter and visualization fundamentally define the use case.
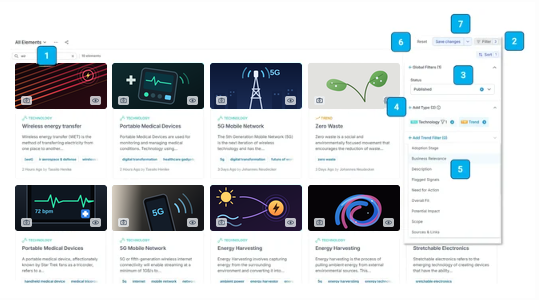
If you want to search the database by specific pre-defined values, you can use the filter options at the top right corner [2].
Click on "Filter" and a modal will open to apply your filter criteria. The number indicates how many filters are currently applied, e.g., 3 filters, one for the type technology, one for the type trend, and the general filter to show published content elements (instead of draft or archived).
When you hover over the entries, an "X" will appear, providing you with a quick option to delete the filters.
To close the filter section, use the arrow pointing to the right next to the name "Filter".
Note
- Filters are global, changing and saving a filter on a view will change the view for everyone.
(To save your own private, customized, view, refer to this article about duplicating views) - No filter option is currently available in Roadmap.
- Filters in Insights serve a different purpose and do not filter for the elements within your workspace, but in the broader ITONICS Data Lake.
- The filter only works within a particular workspace and does not return results from other workspaces.
The modal contains the following options:
Adding & deleting global filters [3]
Global filters are metadata filters that allow you to filter by content publication characteristics, i.e.,
- Created By and Updated by: Allows to filter by the user(s) who created or did the last update on content elements (multi-select and OR combination)
- Updated Date and Created Date: Allows to filter for a timeframe within which content elements have been created or updated lastly (learn what is taken into account in this article, i.e., changes to the title, abstract, text field, or user search field)
- Watched Elements Only: Allows to filter for content that you watch, i.e., where you have subscribed to get email notifications once an update was made
- Tags: Allows to filter for content elements sharing a particular (free-form) tag
- Related To: Allowing you to show only content elements where:
- a relation to another element exists ("relation is", multi-select and OR combination),
- no relations with an existing element exist ("relation is not", multi-select and OR combination), or
- no relationship is set at all ("relation is empty")
By hovering over each global filter option, you will find a blue x icon to reset a specific filter [3]. You can also reset a combination of different filters by clicking "reset" left to "save changes" [6].
Adding & deleting type filters [4]
Type filters define the content/element types that you want to filter for, for instance, show me all trends and technologies. To add a type filter, click on the plus icon and select the types from the list of element types active in your workspace (learn more about the element type configuration options in this article)
Once you have selected one or multiple types, the selected types appear below the add type action. The number of activated types is shown as a number, and the selected types are also shown on top, left to the name "Filter".
By hovering over each global filter option, you will find a blue x icon to reset a specific filter. You can also reset a combination of different filters by clicking "reset" left to "save changes" [6].
Adding & deleting type specific filters [5]
Once you have selected a type, you will find a new option to add type-specific filters.
Note
- If multiple types are activated, you can switch between the type-specific filters by clicking on the name of the type in the "Add Type-Section". The active type is highlighted in a darker blue background color.
- For any property, you have the option to use three different operators, i.e., "is = matches values selected", "is not = matches all values except the selected", or "is empty, or = showing all content elements where no value of the property was yet added"
Click on the "+ Add" option and select the properties that you want to filter for more specifically. The values for this specific filter can be set in a new selection menu.
By hovering over each global filter option, you will find a blue x icon to reset a specific filter. You can also reset a combination of different filters by clicking "reset" left to "save changes" [6].
Saving a view [7]
Once you have applied your filter, you can save this filter setting for easier recall later. Left to the uncolapsed filter modal, you will find "save changes" [7]. You can also save it as a new view when clicking on the arrow.

If you choose this option, you will be asked to enter a name for your saved view/filter. You can also decide whether it should be shared with everyone or whether you want to keep it private for your view.
In both cases, the newly saved view/filter is added to the main navigation to the left as an entry and as an entry at the upper left [1] of the respective tool. When you click on the view's name [1], you will find all views, and you have the option to edit, delete, or duplicate the view from the three dots. Next to the three dots, you will also find the option to share a view with named users via email.
Special filter options — current user filter
To be productive in a system that maybe hundreds of people are using, it is necessary to quickly find ones assigned elements, be it as an evaluator to rate elements, as a content creator, to have an overview of own elements, or as a reviewer, to review assigned elements.
Having a personalized view is essential to being productive. And to not flood the system with new views, use the current user filter.
This filter can be used to filter any user search field and metadata fields like created by, and updated by.
When setup, one view can be used for everyone and it will still be personalized.
Current user filter — setup
- [Optional] Create a new view or duplicate one (recommended, no need to configure the whole filter again)
- Go into the filter options
- Find the respective user search property
- Select current user — it will be the first option available in the searchable multiselect user dropdown
- Save the view
- [Optional] Set the view's visibility to public

Sorting
When you are in the Explorer or on a List, you can change the sorting logic and how the content elements are displayed.
You can either change the sorting logic by switching between the title (alphabetical sorting), the last update date, or the create date [3, see "Sort"].
You can also define whether the list should be sorted ascending or descending.
Please note that when using a search request, a fourth sorting option appears: Relevance.
When you are in Lists, you can also sort your list by certain attributes. You can sort columns in ascending or descending order, as well as alphabetically. Find the field you want to sort by and hover over the column header. A sort icon will appear. Click on the sort icon once to sort the List. Clicking twice will sort the List in the opposite order. At present, you can sort by element title, date fields, number fields, ratings, and numeric ratings.