4️⃣ Workspace Configuration — Creating Different, Isolated Spaces, and Structuring Use Cases
Proper workspace configuration allows you to separate use cases and concerns to provide individual isolated spaces to e.g., different teams. It also allows you to customize the element types, properties, and ITONICS blueprints for each workspace.
Note that the Workspace Configuration feature is part of our Professional offering. It is not available out of the box and needs to be enabled for your organization. Contact us at account_manager@itonics-innovation.com to enable it for you!
- Workspace configuration — overview
- Private vs. public workspaces — managing permissions & restricting access rights
- Configuring element types and properties
- Folders and views — configuring the workspace structure
1. Workspace Configuration — What does workspace configuration do?
Your Innovation OS is designed to engage multiple teams and stakeholders with different interests on one single source of truth. Workspaces thus allow you to provide each of these groups with different (content) interests in their own home. In the following, we describe the 5 key characteristics of workspaces:
- Workspace Creation: System administrators can create and manage different workspaces for different use cases.
- Same tools, different content, configuration, and users: Per workspace, all the tools will be accessible that you have licensed. The only differences may be the configuration, content, and users living in the workspaces. However, content can also easily be copied from one workspace into another workspace.
- Access rights: It is possible to grant everyone in your Innovation OS access to a workspace (i.e., public workspace) or restrict the visibility of a workspace only to some users (private workspace). It is also possible to grant different roles and permissions in different workspaces to the same user.
- Tailor the Element Configuration to the needs of a workspace: After the workspace creation, workspace administrators will be able to adjust the element types by adding or hiding properties, group fields, and element types. This way, the ITONICS blueprint element types and properties can be modified. Workspace administrators can also create custom element types and properties.
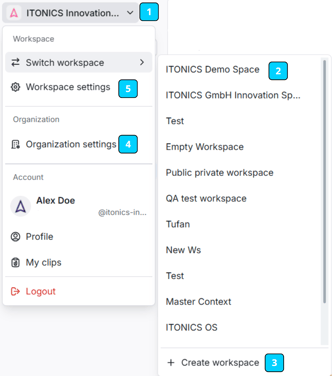
The workspace — that a user is currently in — is always displayed at the top left corner of the system [1]. By clicking on it, a user can "Switch workspace" to another [2], a click on a workspace name will take a user to another workspace. System administrators will also see the option to "+Create New Workspace" at the bottom of the list [3].
System administrators can find the "Organization settings" option [4] in the top left menu after clicking on the workspace name. Upon opening the settings, a click on the "Workspaces" tab will open the list of all workspaces and the option to add or adjust them.
Workspace administrator and system administrators also have the option to enter the "Workspace settings" [5] for the workspace they are currently in directly. From that menu, they will be able to change the visibility, name, the workspace users and their roles, and access the Element Configuration.
2. Private vs. public workspaces — managing permissions & access rights
When creating a workspace, the second thing that should be done (after giving it a name) is to decide who should be part of it and in what role. It is the decision whether the workspace should be public, i.e., open to all the users within your Innovation OS, or whether it should be private. A private workspace will only be visible to the named users in your workspace.
Note that private workspaces are only part of our professional offering. It is not available out of the box and needs to be enabled for your organization.
Contact us at account_manager@itonics.de to enable it for you!
As described above, you need to access the workspace configuration of the respective workspace first. This can be done when you create a new workspace from "+Create New Workspace" [3 in the picture above], your profile and manage workspaces [4], or - as a workspace admin - from general workspace settings [5].
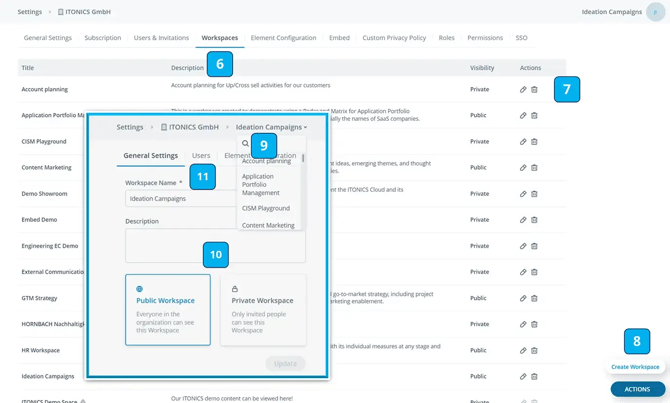
When you enter the workspace configuration as an organization administrator [6], you will first find a list of all the workspaces within your organization. To change any of the workspaces (or delete any), find the icons on the right side of the list [7]. If you want to create a new workspace, you will find an additional option in the bottom right corner of the workspace administration page.
Now, for system administrators and workspace administrators, the same page opens. The respective workspace will be shown on top of the page [9]. If you have the respective permissions, you can also jump to another workspace when clicking on the name and finding another respective workspace.
At the bottom, you find the option to set the visibility of the workspace. Should it be visible to everyone in your innovation OS? Then, choose the option "public workspace". Should it be restricted? Then, choose the option "private workspace".
To assign a user role or change it to something else than the default role, follow these steps. Click on your profile in the left bottom corner [4, from the first picture of this article]. You will find the option "workspace users" [5]. Click on it.
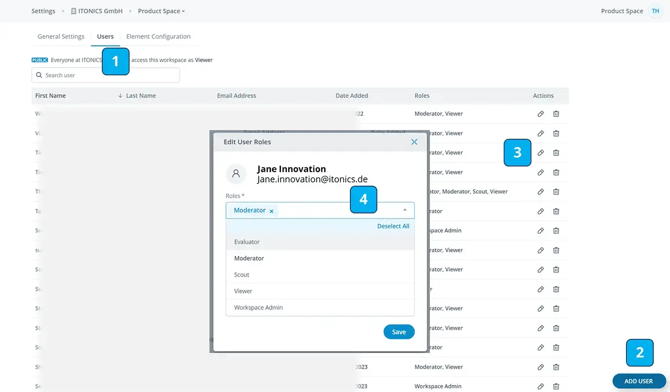
On the next screen, you will find the user list of your workspace [1, in the picture below]. You can now add users to a private workspace or change the role of a user in a public workspace when clicking on "add user" [2].
A popup opens from which you can search for the users being members of your Innovation OS. Find the respective colleagues (multiple selection is possible) and assign the workspace-specific role that you want to provide them with [4]. In the same manner, you can also change the role a user has. The only difference is that you need to find the pen icon to adjust the role of a user in your workspace [3].
Please pay attention to the following notes:
- Changing a workspace to public
- Changing the visibility settings of a workspace from private to public needs to be done by the Application Admin. Changing it this way will expose all content to all users who are part of the entire Innovation OS. All users who are already in the workspace, stay in the workspace and keep their user roles.
- Changing a workspace to private
- Changing the visibility settings of a workspace from public to private will mean that only users with adjusted roles keep access to the workspace. All users with no adjusted roles will lose access. If you want to keep a viewer as a viewer in the system, you need to manually add the user with this respective role.
- The default setting is public
- If you create a new workspace, it is a public workspace by default. This is also indicated in the visibility column in the workspace settings menu [7].
- The default user role is the system default role
- In a public workspace, all users of the organization are automatically assigned to the default role of the system, i.e. Viewer. Yet, you can change the role individually.
- Only users with changed roles are listed in the user list of a public workspace
- Newly invited users to your organization have automatic access to all public workspaces and will have the default role assigned to them. Yet, you can assign roles to users that are different from the default role of the system. Only the users with a role that is different from the default are listed. This is also indicated by a label saying "Everyone at [Organization Name] can access this workspace as [default role]".
- All users have to be added manually to a private workspace
- To add a user to a private workspace, they need to be first a part/a user of the entire Innovation OS. Once they are users in your organization, you have to assign a role for this specific workspace to the users. The default role of your organization does not have any effect. The default role only applies in private workspaces if the Application Admin invites new users to the organization and assigns them to a workspace directly.
- Downgrade from Professional to Starter subscription plan
- If you decide to downgrade from your Professional subscription plan to a Starter plan, the following behavior applies:
- Private workspaces stay private
- Private workspaces can not be changed to public
- Public workspaces stay public
- Public workspaces can not be changed to private
- If you decide to downgrade from your Professional subscription plan to a Starter plan, the following behavior applies:
3. Configuring element types and properties
As a Workspace Administrator, you can change the name and description of your workspace, define its visibility, manage the user list, and you can adjust the element configuration to what you need in your workspace.
System administrators can create a workspace by navigating to the list of workspaces at the top left corner of the system [1, on the first picture of this article] and finding the option to "+Create New Workspace" at the bottom of the list [3]. They can also navigate via their user profile (bottom left corner) to manage workspaces [4] and find the actions button on the next screen in the bottom right corner [8, in the second picture of this article].
Once they start the setup of a new workspace, a popup appears. At the bottom of the pop-up, they can select the element types that should become part of this workspace.
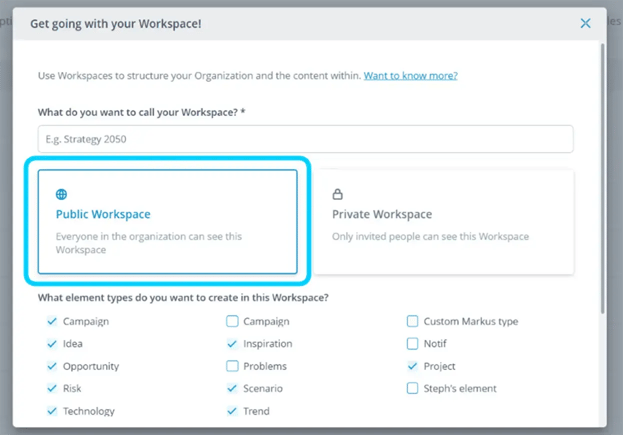
Once your workspace is created, the workspace administrator can now further adjust and create the element types and properties. To do so, the workspace administrator needs to access the element configuration of the workspace.
The workspace administrator can access it from his/her own profile (bottom left corner) and the menu "manage workspace elements" [5, in the first picture of this article). The workspace is displayed at the top and the blue underline indicates that the element configuration has been accessed [1].
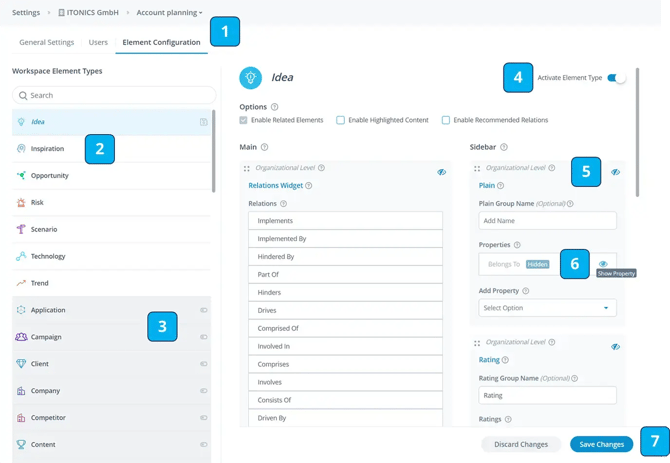
Now, the workspace administrator sees the list of all available element types [2]. All de-activated element types are displayed in grey and with a toggle. To activate or de-activate an element type, click on the name of the element type and find the activation option in the top right corner of the element type profile [4].
The workspace administrator can now also decide whether he/she wants to display all the groups [5] and properties [6] or whether he/she wants to hide some of them in their workspace. By clicking the eye icon, the groups/properties will either be shown or hidden.
Furthermore, workspace administrators now can add their custom properties to the element types. Within each group, there is an "add property" option. Clicking on it will allow you to search for other properties (from the global element configuration) and select them for your workspace [below 6].
You can also use drag and drop to change the position of groups and properties within a group. Once done, the changes need to be saved or discarded [7].
Note
-
- Deactivation only works for empty element types.
- You can only deactivate an element type if there is no content entered for this element type in the workspace, and if changes to the element type in this workspace have been reverted (see 5.). If you want to deactivate, you must first delete all elements of that type from the workspace in Explorer.
- Values in hidden properties are not lost.
- Hiding a property after values have been added (e.g. you have added the segmentation "Economical" to a trend in Explorer) will not delete those values. Instead, when deciding to display the property again, those values will just show up again.
- The ITONICS Showroom Workspace cannot be changed at all.
- Limitations to properties
- Once created, a property can currently not be deleted. They can be hidden from all Element Types, of course.
- Once created, options on dropdowns, and hierarchical dropdowns cannot be removed. They can be reordered, new ones can be added and labels can be changed, however.
- Once created, options on ratings can be neither removed nor reordered. New ones can be added and labels can be changed, however.
- Minimum and maximum values for number and numerical rating properties cannot be made more restrictive due to migration issues of existing user ratings. They can be made less restrictive, however.
- Limitations to element types
- Once changes are saved, added properties cannot be removed from an element type. Removing them from the element detail page simply hides them from the element type.
- Element types can only be deleted if there are no elements of that type anywhere in the system.
- Deactivation only works for empty element types.
4. Folders and views — configuring the workspace structure
 The real work gets done inside the different workspace views and folders.
Different to other innovation platforms, the ITONICS Innovation OS transitioned to a use case based navigation structure with customizable folders and views.
This navigation allows for grouping content on a use case basis into folders and not having to rely on an old, cumbersome navigation structure.
Easy, fast and efficient.
See in the picture on the right how a use case based navigation structure could look like.
Structuring views
The navigation is fully customizable, after adding a folder or a view of any kind (Radar, Matrix, Board, List, Grid, etc.) via the plus icon in the top right of the image, use drag-and-drop to place the view according to your needs.
Setting a landing page
The first element below the default All Elements view is set to be the default landing view for all users accessing the workspace via the default workspace link.
Note that, if the first element in the navigation, below the All Elements view, is a folder, the All Elements view will be the default landing view.
E.g.: In the picture above, the All Elements view is the landing view, because the first element in the customizable part of the navigation is a folder.