Note: Prism, the AI chatbot, is limited by your own permissions on the platform, if your account is registered as a viewer, you cannot create, update or rate elements using the AI.
Note: Prism is enabled by default for all subscribers unless a different arrangement is requested.
If you want to update your preferences, please get in touch with us via account_manager@itonics-innovation.com.
Attention: Having trouble using Prism? Ensure that your IT department allows wss://itonics-ws.com through your network firewall. Blocking this WebSocket connection may cause loading issues.
1. ITONICS Prism — general information
2. Master Context — the heart and soul of Prism
3. Context Awareness - Prism sees what you see
5. External Intelligence with Perplexity Search
6. Auto-create trend and technology radars
7. AI use cases — how to interact with Signals and Elements
8. Auto-rating — speed of change
11. Data security and protection — Prism
12. Smart Actions — autofill description, and tags
All parts of ITONICS Prism are hosted on an ITONICS server cluster, data that you enter into the chat or that Prism accesses, never leaves the ITONICS ecosystem and is not used to train the AI models in any way!
Privacy of your data is a top priority at ITONICS, read more here.
ITONICS Prism AI
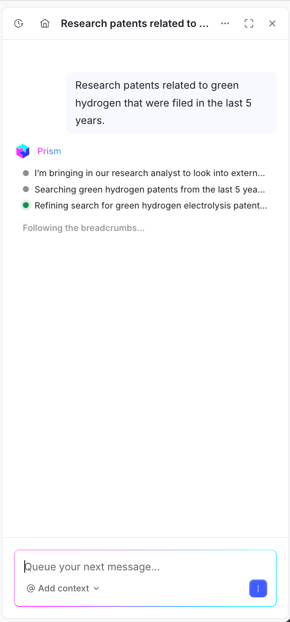
When in the workspace, to access Prism, press the dedicated button in the bottom right corner.
Prism chat is based on Claude 4.0 Sonnet, a LLM similar to ChatGPT, but the internal functionalities are split up into different agents who all communicate between each other based on what prompt they are executing, sometimes referred to as multi-agent debates or deep reasoning.
So far the different agents are:
- Supervisor: responsible for coordination
- Signals Agent: responsible for the signals pool and signals from web sources (via Perplexity API)
- Elements Agent: responsible for elements
- Knowledge Agent: responsible for all questions regarding the ITONICS Innovation OS
If you are interested in what is being discussed after your prompt, clicking on the little grey arrow will show the internal reasoning process.
Master Context
Get the most value out of each prompt and set a Master Context for your workspace.
What is a "Master Context"?
Large language models work best when you provide them with relevant background information.
The Master Context is a persistent block of text that gets infused into every conversation you start with the AI. Instead of repeating your company’s mission, priorities, or constraints before every prompt, the Master Context ensures the AI always has this baseline understanding.
Think of it as the lens through which the AI interprets every question, idea, or suggestion, helping it generate responses that are aligned with your company’s identity and strategy.
Because the Master Context is especially reliant on your use cases and your companies needs, ITONICS can only help you so much with crafting the Master Context. This is why it is crucial that you collect feedback concerning Prism from your colleagues and refine it yourself.
Why is a Master Context important?
- Consistency: Keeps answers aligned with your goals across multiple sessions.
- Efficiency: Saves time by avoiding repeated instructions.
- Relevance: Ensures outputs resonate with your brand voice, strategic direction, and users’ needs.
- Quality: Increases the chance that suggestions are practical, feasible, and tailored to your use cases.
- For example, if you are having issues with, on what basis Prism creates elements and would like more information to each element, include a section about what you would like to have included in Prisms response when creating elements.
How to craft the perfect Master Context
A strong Master Context addresses key dimensions of your organization. You can think of it as answering the following guiding questions:
-
Core Identity
- Who are you as a company?
- What values, principles, or cultural traits guide your decisions?
- Strategic Goals
- What outcomes are you working toward?
- What KPIs or success metrics matter most?
- Priorities & Challenges
- What problems are you trying to solve?
- Which trade-offs (speed vs. safety, cost vs. innovation) must be considered?
- Technology Areas & Capabilities
- What platforms, tools, or technologies define your domain?
- Where do you innovate, and where do you rely on partners?
- User & Market Focus
- Who are your users or customers?
- What do they expect in terms of experience, reliability, and trust?
- Constraints & Non-negotiables
- Regulations, compliance, safety, sustainability, or ethical standards that must always be respected.
- Use Cases
- Outline use cases for the AI, describe them as in-depth as possible and what Prism should do when prompted.
Hint: If you need support with developing an effective Master Context, start by outlining its intended purpose, provide a brief overview of your organization, such as the introductory paragraph from your company's Wikipedia entry and use an AI chatbot to help generate a first version of your Master Context.
Important considerations — improving Master Context as you go
Getting the perfect master context is crucial to mastering Prism, it is not as easy as it seems. While getting a first version is pretty easy, by using a LLM for example, this will not be perfect, encourage coworkers to provide feedback to your workspace administrator, if they achieved a particularly good response with a certain prompt, ask the Internet and refine the Master Context as you go.
If you have different use cases for Prism, specify each one as accurately as possible, this will greatly affect the results that the AI will produce in regards to that specific use case.
As a basic example, you have a formula to calculate which ideas should proceed in the innovation funnel, something like:
If "expert rating" >= "high" then status = "next stage"
Include this in the Master Context:
Use Cases:
- Advancing Ideas for Idea Innovation Funnel: when prompted to advance ideas in the innovation funnel, use this formula and stick strictly to it, if you have issues, explain them in your response:
"If expert rating >= high then change status to next stage"
Now Prism will always use this formula to calculate that use case.
And most important of all, play around and try stuff out, as the token limit has been removed for everyone for now, feel free to test Prism, how you can best integrate Prism into your workflow and:
Share your feedback regarding the master context with your Customer Success Manager, as this is a new feature and AI is still new for everyone, constructive input is greatly appreciated.
Setting the Master Context in the ITONICS Innovation OS
Note that the Master Context is applied on a workspace scope. Which means, if you have multiple, different workspaces with different goals, you can and should, set different Master Contexts.
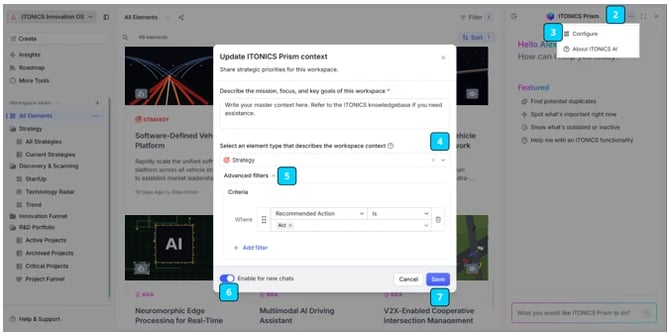
To set the Master Context, open Prism via the designated AI button in the bottom right.
Then locate the three dots [2] at the top right of the now expanded side panel and select "configure" [3].
Only Workspace Admins can set the Master Context.
Now write or paste the Master Context in the text field.
At the bottom of the popup you can see another dropdown menu [4] to select an element type. Select which element type best represents this workspace, this is not necessary, but if you already have a "strategy" element or something similar in your workspace, it is recommended to select that and if possible adjust the criteria below, under "advanced filter"[5], to select exactly the elements you want. The advanced filter works just like the regular filter.
Last but not least, make sure "Enable for new chats" [6] is enabled, press "Save" [7], and you are ready to go.
Context Awareness
PRISM automatically understands the context of what users are currently viewing in the platform (e.g. Radar, Table, Element).
Capabilities:
- Detects the active page and visible elements
- Interprets prompts like “summarize these elements” or “rate my ideas” based on on-screen content
- Displays the active context transparently within the conversation
- Allows manual override to define a specific scope (elements or views)

Queueing
You do not have to wait for one prompt to finish before sending the next. Prism lets you queue several prompts, which are then processed one after another. This is particularly useful for batching, when you want to line up a series of tasks and let Prism work through them without supervision.
To queue prompts, simply send a new prompt while Prism is still processing a previous one. The new prompt is added to the queue and runs as soon as the one before it completes.
While prompts are waiting in the queue, you can:
- Reorder the queued prompts by dragging them into the sequence you want.
- Stop the queue at any time to halt processing.
- Repeat the queue, for example to run the same series of prompts again in a new context.
To revisit something you asked earlier, use the up and down arrow keys in the input field to scroll through your previous prompts, similar to a command history.
External Intelligence with Perplexity Search
Prism integrates with the Perplexity Search API to retrieve additional external knowledge beyond Signals.
Perplexity is not used for generative reasoning. It functions as a document search layer. Prism uses it to retrieve relevant documents and then synthesizes the information within the ITONICS system.
Signals focus on structured sources such as:
- News
- Patents
- Academic Research
Perplexity complements this by enabling discovery of additional document types such as:
- Public funding announcements
- M&A operations
- Government publications
- Press releases
- Market reports
- Corporate announcements
Example: “Find public funding programs for drone technology in Germany.”
Prism will:
-
Query Signals for related news, patents, or research.
-
Use Perplexity to search for: Official funding programs, Government announcements, Federal or EU innovation grants
-
Synthesize results into a structured output.
Advanced Search Filters
Perplexity enables PRISM to apply structured filtering via natural language prompts when retrieving documents. These filters include:
-
Date filter
-
Search documents created or updated before or after a specific date
-
- Recency filter
- Limit results to recent publications such as:
- Year
- Month
- Week
- Specific date
- Default Setting: Last Month. Prism can override these defaults based on user instructions.
- Limit results to recent publications such as:
- Country filter
- Limit results to documents published in one specific country per request.
- Language filter
-
Limit results to up to 10 languages per request.
-
- Domain filter
- Include or exclude specific domains
- Include: "db.de", forbes.com, ".gov"
- Exclude: "-fox.com, -yahoo.com
- Maximum of 20 domains per request.
-
A request can either include positive domain filters or exclude domains, not both at the same time.
- Include or exclude specific domains
Reviewing and applying Prism's changes
When Prism proposes creating or updating an element, it shows the change as a card with Reject and Accept buttons. Accepting writes the change straight to the workspace. Next to these buttons is a dropdown that controls how future changes are handled:
- Ask every time (default) — Prism shows the Accept/Reject card for every proposed change, so you confirm each one.
- Automatically apply every time — Prism applies proposed changes without asking for confirmation.
How the "Automatically apply every time" choice behaves:
- Lifetime: The setting is permanent. It persists across chats and sessions, not just the current conversation.
- Scope: It applies to all element types, not only the element type you were working on when you set it.
- Reversibility: You can switch back at any time — either by reopening the same dropdown and selecting "Ask every time," or from your profile settings.
Because auto-apply writes directly to the workspace with no confirmation step, switch it on only once you're comfortable with the quality of Prism's proposed changes.
Segment and rate radars
After creating a radar with its designated element types, let Prism do the job: Automate radar segmentation and let the AI rate the elements based on your, company specific, catered to your needs, master-context.
Click on the Prism button in the bottom right corner, a new side panel will open. In the top right corner you have the option to close Prism, expand the side panel to full screen or the three dot menu, with the option to set a Master Context for this workspace.
To segment your elements, simply ask Prism and don't forget to specify in your prompt which element type you want to segment.
Rating elements works similar to segmenting them. Specify which elements and fields you want to include in the rating process and the AI will do the job.
But be aware, rating is still based on generative AI, while Prism is much faster than a human at rating, the nature of generative AI is still to guess and therefore you may experience that ratings don't follow your standards.
It is recommended to use qualified personnel at your company to rate important elements.
Note that the role assigned to you, needs create permissions to be able to create elements utilizing Prism.
Use Prism to interact with signals and elements
ITONICS Prism can interact with the ITONICS signals pool, web sources (via Perplexity API) and elements within the workspace to enhance your prompts. Below you find an overview of valuable prompts to execute different use cases:
Prompt playbook for signals / web sources:
Tip: You can use all filters in the prompt that are available in the Insights Feed.
| Use case | Prompt template | Prompt example |
| Signals | ||
| Create an element based on Signals | Create one [element type] based on all signals from [country] between [start date] and [end date] about [topic]. Combine all insights into one [element type]. | Analyze all signals related to autonomous cars from the United States between May 1, 2024, and July 1, 2024. Synthesize the key insights, trends, or developments from these signals into a single, coherent Idea. The Idea should include a clear opportunity or problem statement, supporting evidence from the signals, and a potential solution or innovation approach. |
| Summarize Signals | Summarize all signals from [country] between [start date] and [end date] in the category [category], including the companies [companies]. | Summarize all signals from the United States between 01.05.2024 and 01.07.2024 in the category Technology and Engineering, including the companies IBM and Apple. |
| Identify a specific source signal type related to an element | Show recent [source type] related to [element name]. | Show recent patents related to Autonomous Cars. |
| Web Sources (Perplexity) | ||
| Conducting general research | Identify new developments in [topic] within the [industry]. | Identify new developments in Artificial Intelligence within the car industry. |
| Discover public funding programs | Identify public funding programs related to [topic] in [country], published within the last [recency period], prioritizing official domains. | Identify public funding programs related to hydrogen infrastructure in Germany published within the last month. Prioritize .gov domains and summarize funding scope, application deadlines, and funding volumes. |
| Identify M and A activity | Identify recent mergers and acquisitions related to [topic] within the [industry] in the last [recency period]. | Identify recent mergers and acquisitions related to battery recycling within the automotive industry in the last three months. Focus on official press releases and summarize acquisition targets, transaction intent, and strategic impact. |
| Regulatory and policy research | Identify new regulations or policy updates on [topic] in [country or region], published in the last [recency period]. | Identify new AI regulatory updates published in the European Union in the last month. Prioritize government domains and summarize scope, compliance requirements, and affected industries. |
| Competitor & market intelligence | Identify recent product and software updates from [Competitor A] and [Competitor B] published in the last [Recency Period]. Specifically investigate [Specific Technology/Trend] and features that bypass traditional hardware limitations, such as [Example Signal 1] or [Example Signal 2]. Compare these findings against the existing ecosystem of [Our Product/Service], focusing specifically on our [Core competitive advantage]. Highlight where these competitors are successfully closing the 'closed-loop ecosystem' gap. |
Identify recent product and software updates from Tesla, Inc. and BYD Company published in the last three months. Specifically investigate advancements in battery management software and AI-driven vehicle optimization features that bypass traditional hardware limitations, such as OTA performance upgrades or AI-based battery health prediction. Compare these findings against the existing ecosystem of OurEV Platform, focusing specifically on our core competitive advantage in closed-loop battery lifecycle management and predictive fleet analytics. Highlight where these competitors are successfully closing the “closed-loop ecosystem” gap. |
| Analyze market sentiment | Identify emerging [B2B / B2C] market trends and sentiment shifts regarding [Technology focus] in [Regions]. Prioritize current market research, industry whitepapers, and [Current Year] analyst transcripts. Analyze the transition from "Ambition" to "Delivery." Specifically search for evidence of final investment decisions vs. speculative announcements. Identify the top 3 drivers. Detail barriers including grid bottlenecks, CAPEX/Interest rates, and Offtake Uncertainty. Compare these findings against [Company Name]’s [Strategy Name]. Cross-reference trends with the company's recent financial reports ([Specific Figure]). Expected Output Format: 1. A scale from "Speculative" to "Industrialized" with a 1-paragraph justification. 2. A side-by-side comparison of market forces. 3. 3-5 bullet points on how these trends impact the company's long-term targets. |
Identify emerging B2C market trends and sentiment shifts regarding AI-powered consumer devices in North America and East Asia. Prioritize 2026 market research reports, consumer sentiment surveys, semiconductor supply chain commentary, and 2026 analyst earnings transcripts. Analyze the transition from “Ambition” to “Delivery,” specifically identifying evidence of large-scale commercial rollouts, measurable user adoption and monetization metrics. Identify the top three market drivers. Compare these findings against Apple Inc.’s AI integration strategy, cross-referencing trends with the company’s recent financial disclosures. Expected Output Format: 1. A scale from "Speculative" to "Industrialized" with a 1-paragraph justification. 2. A side-by-side comparison of market forces. 3. 3-5 bullet points on how these trends impact the company's long-term targets. |
| Use case | Prompt template | Prompt example |
| Summarize an element | What is the element [element name] about? | What is the element autonomous cars about? |
| Find duplicates | Are there any duplicates to the element [element name]? | Are there any duplicates to the element autonomous cars? |
| Find related elements for a topic | Are there elements/[element type] related to the topic [topic]? | Are there Ideas related to the topic Artificial Intelligence? |
| Find related elements for a signal | Are there any elements related to the signal [signal name]? | Are there any elements related to the signal "Lasers and their Industrial Applications"? |
| Find related elements to another element | Are there any elements relevant to the element [element name]? | Are there any elements relevant to the element autonomous cars? |
| Create an element based on other elements | Create a [element type] based on the element/s [element names]. | Create a Trend based on the element autonomous cars and self-driving trucks. |
| Compare elements | What is the difference between the elements [element name 1] and [element name 2]? | What is the difference between the elements autonomous cars and self-driving trucks. |
| Compare elements | What are the similarities between the elements [element name 1] and [element name 2]? | What are the similarities between the elements autonomous cars and self-driving trucks? |
| Perform a risk analysis on an element | What are potential risks associated with the element [element name]? | What are potential risks associated with the element autonomous cars? |
Speed of Change index
To activate the speed of change index, head to the element type configuration of your workspace. You can either create a new rating type group [1] or use an existing one. Search for "Speed of Change" and add them from the dropdown [2].
You can rearrange rating criteria by dragging and dropping and hiding the ones you do not want to use anymore by clicking on the eye icon. Once you are happy with your rating setup, hit Save Changes.
You can also compare the speed of change across multiple content elements when you head over to the technology or trend radar. Open the radar view configuration, select Distance, and choose either Speed of Change [90 Days] or Speed of Change [180 Days].
You can now compare the trends and technologies on the radar by the Speed of Change of the last 90/180 Days.
When you watch a content element, you will receive an email notification if the speed of change changes.
-png.webp?width=670&height=461&name=image%20(43)-png.webp)
Limitations
While Prism is a powerful assistant for creating, summarizing, and analyzing innovation content within the ITONICS Innovation OS, there are still certain technical and functional limitations to be aware of. Understanding these helps you get the most accurate results and avoid unexpected behavior.
Element agent capabilities
The Element Agent is responsible for creating and updating elements in your workspace. However, its abilities are currently focused on specific fields and operations.
Prism can:
- Create new elements within your workspace
- Update existing elements, including the following fields and property types:
Title, summary, rating properties, (hiearchical) dropdown properties, numerical properties, date properties, text properties, rich text properties, hyperlinks, tags
Prism cannot (yet):
- Add or manage attachments
- Set or modify relations between elements
- Update all elements in bulk
Search behavior
PRISM dynamically determines how to execute a search based on the user’s query.
Instead of a fixed search pipeline, PRISM chooses between semantic search, structured filtering, or a combination of both.
1. Filter-driven queries (no semantic search)
If the user specifies a clear structured filter, PRISM performs a direct filter query.
How it works:
- Executes a structured search on fields such as:
- status
- dates
- users
- ratings
- dropdowns
- No semantic search is applied
Example:
- “What projects am I watching?”
- “Show ideas in draft status”
2. Semantic search (no explicit filters)
If no structured filters are provided, PRISM performs a semantic search.
How it works:
- Searches across text-based content:
- titles
- summaries
- descriptions
- Interprets meaning and intent of the query
- May automatically refine results using known element types or system structure
Example:
- “Find projects that talk about Bitcoin and Gold ETF”
3. Combined search (semantic + filters)
If the query includes both semantic intent and structured conditions, PRISM combines both approaches.
How it works:
- Performs semantic search to identify relevant elements
- Applies structured filters on top of the result set
Example:
- “Find projects about Bitcoin and Gold ETF that are in draft status”
Understanding and context limitations
Prism aims to execute every request as completely as possible, but unlike a human, it cannot always judge how well it has understood your intention. If a request is ambiguous or incomplete, PRISM might still try to perform the action rather than asking for clarification, which can lead to unexpected results.
To minimize misunderstandings:
- Write clear and specific prompts
- Include relevant context or workspace details
- Confirm updates before performing large-scale actions
- Configure the master context accordingly
Message context
To generate its next response, Prism primarily uses the five most relevant messages from the conversation with vector search. It also includes the last three messages to maintain the flow of the chat.
This means:
-
Prism can use earlier messages if they are highly relevant to your latest prompt.
-
The most recent messages help Prism stay aligned with the current conversation.
-
If one of the most relevant messages is already included in the last three messages, it is not counted twice.
-
In long conversations or chats that cover multiple topics, Prism may sometimes draw on context that is only partly related to your current request.
For best results, keep the conversation focused on one topic and restate important details when returning to an earlier point.
AI models in use
Since different AI models have vastly different use cases, Prism is using six different models, each for a different use case:
| Feature | Purpose | Model | Model by |
| Supervisor Agent (Prism) | Orchestrates agents, routes requests, constructs chat responses | Claude 4.6 Sonnet | AWS Bedrock |
| Elements Agent (Prism) | Search, create, rate, segment elements, predict fields | Claude 4.6 Sonnet | AWS Bedrock |
| Signals Agent (Prism) | Retrieve news, patents, publications | Claude 4.6 Sonnet | AWS Bedrock |
| Knowledge Base Agent (Prism) | Search platform docs and guides | Claude 4.6 Sonnet | AWS Bedrock |
| Document Search (Prism) | Retrieve documents using vector similarity | Cohere Embed Multilingual v3 | AWS Bedrock |
| AI RTE Editor | Generate formatted text content | Claude 3.7 Sonnet | AWS Bedrock |
| Autofill description (Smart Actions) | Generate descriptions for elements | Claude 4.0 Sonnet | AWS Bedrock |
| Autofill tags (Smart Actions) | Generate tags for elements | Claude 4.0 Sonnet | AWS Bedrock |
| Strong signals | Summarize large amounts of text | Claude 4.5 Haiku | AWS Bedrock |
Data security and protection — Prism
All parts of ITONICS Prism are hosted on an ITONICS server cluster, data that you enter into the chat or that Prism accesses, never leaves the ITONICS ecosystem and is not used to train the external AI models in any way!
Privacy of your data is a top priority at ITONICS, read more here.
At ITONICS, data protection and privacy are at the core of how Prism AI operates. Every interaction with Prism is designed to keep your organization’s information secure, private, and fully under your control.
Secure structure — tenant, workspace, and user
Each organization runs in its own private tenant space within the ITONICS Platform.
This ensures your data remains isolated from other customers and accessible only to authorized users.
- Tenant — Your company’s dedicated, secure environment where all data and AI features (like Prism AI) are contained.
- Workspace — A protected area for team collaboration. Data and AI contexts are encrypted and access-controlled.
- User — Each user is authenticated and granted only the permissions they need. All communication is encrypted end to end.
Secure AI processing
Prism AI works within a secure AWS environment to handle every request safely and efficiently.
- Encrypted communication — All messages and data exchanges are protected with modern encryption (TLS 1.2+).
- Verified access — Every request is validated by tenant, workspace, and user identity before processing.
- Context-aware responses — Prism AI uses workspace-specific instructions to tailor outputs, without exposing data outside your environment.
- Isolated AI agents — Specialized agents (for Signals, Elements, and Knowledge Base) operate inside a private, access-restricted environment.
- Data privacy — No prompts or responses are stored or used for AI model training. Processing happens only within regional (EU/US) AWS environments.
Infrastructure and privacy protection
Prism is built on a multi-layered security framework:
- All data is encrypted at rest and in transit.
- Every operation runs inside a private, access-controlled AWS network.
- Full audit logging ensures transparency and compliance.
Your data stays yours.
Prism never shares, sells, or exposes customer information — ensuring your innovation activities remain private, compliant, and secure.
Smart Actions — autofill description and tags
We help you reduce the burden of adding descriptions, or tags by our smart action feature.
Autofill description
Go to any content detail page and find the smart action button below the content title. Choose Autofill Description from the Smart Actions in the header or navigate to the Description section. A modal will open and create a suggested description for you.
Autofill tags
Go to any content detail page and find the smart action button below the content title or navigate straight to the tag section. Choose Autofill Tags and the system will return a suggestion of tags based on your provided Summary. This means that suggestions may include both existing tags from your platform and entirely new tags. If you select a suggested tag that already exists in your platform, it will automatically be merged with the existing tag, ensuring consistency and avoiding duplicates. Not fitting tags can be removed by pressing the "x" icon next to the respective tag. Insert your tag selection.
You can also add tags to an element via the chat. Specify which element or elements you have in mind and ask Prism to generate tags for you.