This documentation will guide you through the process of setting up, configuring, and publishing your ITONICS Sites, ensuring you can harness their full potential for productive ideation and innovation.
With ITONICS Sites, you can:
- Create engaging forms
Easily design and deploy forms to gather specific information, whether for internal surveys or external data collection. - Develop effective campaigns
Launch targeted campaigns to foster ideation, encourage participation, and drive innovation across your teams. - Build custom HTML sites
Leverage the power of HTML to create fully customized sites that align with your branding and specific project requirements.
Create customized campaigns, landing pages for your innovation endeavours, and everything else you can think of.
Sites — Overview
Note that any changes done to parts of a Site, be it to a layout page or a form page, will stay in a draft mode until published.
Saving edits will not push them to the live environment.
Get an overview of all Sites associated with this workspace and create new Sites.
General Sites structure
- Sites can be Draft (default), Published, or Unpublished changes
- Sites have Pages attached to them
- Pages are either regular HTML Pages or Form Pages
- Form Pages have element types attached, inherit their properties and always create elements. Created elements have Site source attached, “Site source” property
- Layout Pages are regular HTML with optional inline css (via Tailwind)
- Pages are either regular HTML Pages or Form Pages
Navigate to the Sites Overview
- On the left side menu, press on More Tools
- Press on Sites
- It is also possible to pin items of the More Tools section to the menu bar by pressing the pin icon next to them, note that this pin is per user, items are not pinned globally.
Note that this settings-page is only available to users with Admin permissions.
Sites overview tab

Actions in the overview tab
|
Action |
|
Description |
|---|---|---|
|
Enter Site Configuration |
Click on the title to enter a Sites configuration |
|
|
Sort |
1 |
Sort by
Order
|
|
Preview |
2 |
Preview how a Site looks like |
|
Duplicate |
2 |
Duplicate Site with all its components |
|
Delete |
2 |
Delete Site (with confirmation window), this will hard delete a Site and all of its components except created properties and elements. |
|
Create |
3 |
Create new Site
|
Site Creation
This section explains how to create an ITONICS Site.
Creating the Site
- Click Create Site
- Select a template
- Enter a Site title
Site Configuration
This section explains the configuration options for Sites and Pages.
Site Configuration — Overview
Upon creation, you will land on a page that looks like this.
Actions in the Site configuration
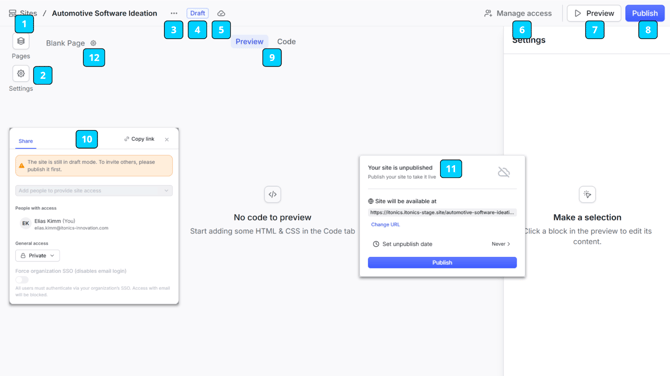
There are several actions possible in this window, learn which ones below. Also, see the picture below, for reference.
|
Action |
|
Description |
|---|---|---|
|
Pages |
1 |
All pages of the Site |
|
Settings |
2 |
Settings
|
|
Site settings |
3 |
Site settings
|
|
Visibility |
4 |
Set visibility
|
|
Synced |
5 |
Indicates whether changes on the Site are up to date with the cloud |
|
Manage access |
6, 10 |
Manage who can access the published Site
Copy link of the home-page Note: only users with access |
|
Preview |
7 |
In a new tab, preview how the page will look like to the end-user, this will always display the "home-page” |
|
Publish |
8, 11 |
Configure how to publish the Site
|
|
Preview / Code |
9 |
Main work area
|
|
Page settings |
12 |
Page Settings
|
Page
ITONICS Page is the webpage the end-user will see when accessing the Site.
There are two types of Pages:
- Layout-Page
The layout page is fully customizable with HTML, and Tailwind and can be used as a landing page and for whatever else that is needed. They can be dynamically changed and cross-referenced in other ITONICS Pages. Use them to setup the entire campaign page. - Form-Page
The form page, as the name indicates, is used to submit elements into the ITONICS Innovation OS, select an element type and submit any element you want.
The form-page can be configured exactly like a processes form.
Configure all properties necessary for the element, save, and any element submitted will appear in your Innovation OS.
This section explains how to create a Page, what to keep in mind, best-practices and an example.
Page Creation — Layout
Setup the HTML for the landing page, home page, contact page, privacy, and whatever else is needed for your use case. Follow the steps below to learn how.
After creating a Site, the next step is to add Pages to it.
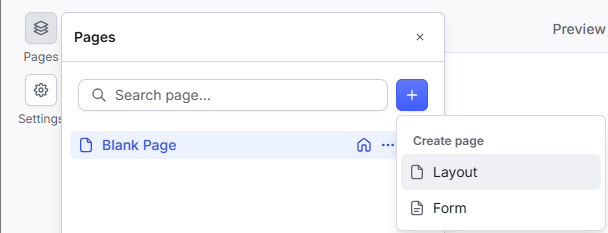
- Go to Pages
- Press “+” next to “search pages”
- Select Layout
- Name the Page
- Press enter
- New Page will be created
- It will open in the editor window in the middle
Setting Options for Pages
A new page has a set of options that can be performed on the page.
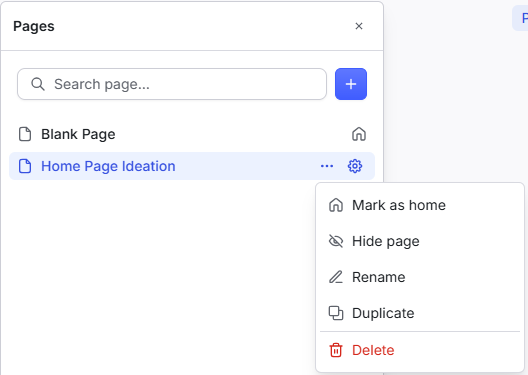
Change its name or slug via the Page settings cog-icon and hidden behind the 3-dots button, perform:
- Mark as home
Sets the redirect for the Site URL to this Homepage
Only one Page can be set as home - Hide page
Important for already published Sites, hidden pages cannot be accessed outside of the editor. - Rename
Change name of the page - Duplicate
Creates an exact copy of the page
Page Setup — Layout
This section explains how to generate HTML code for the Layout Pages, how to integrate that into the Page, what else to keep in mind, and best-practices.
Prompt engineering
In the age of LLMs, creating HTML code is as easy as engineering the right prompt and copy-pasting it into the ITONICS code editor.
To generate HTML code that can be copy-pasted into the Page editor, follow these steps.
- Use case: Think of the exact scenario that you want to cover with this page.
- LLMs will consider every part of your prompt, therefore be as accurate as possible.
- Personalize — include the company's name, the goal of its innovation endeavours and if you have access to your companies style-guide, and you are allowed to upload it to an LLM, upload that pdf too (this will ensure exceptional design results).
- Required buttons — Include whether or not the page should have a button to submit information (a link to a form page) and other UI elements.
- [Optional] If you have technical knowledge, feel free to include detailed information.
- Required keywords, keyphrases and best-practices: Include these keywords in your prompt, otherwise it will not work.
- Use HTML
To ensure the result will be HTML code. - Use only Tailwind styling, any other styling will be removed by the code editor
To ensure the result will be of high quality and will be able to be displayed properly.
Tailwind CSS is a utility-first CSS framework, it is responsible for making the pages appear pretty, without this, all Pages will look dull and lame. - Attach your company specific style guide
Most LLMs nowadays allow you to upload attachments. Use this to attach your company specific style guide (Warning: check first if your companies regulations allow for this, as some companies might prohibit this), this will greatly improve design and align it with the rest of your online presence. - Template to paste into every prompt
-
Create HTML code to paste into an online code editor, this code editor has strict guidelines that you have to follow, these are: only ever use regular html with inline tailwind, if state management is needed, use CSS-only Tailwind group variants, do not include a <head>, replace <body> tags with <div>, do not ever use <style>, <link>, or <script> tags as these will be removed by the code editor and will break the code otherwise.
-
- Use HTML
- Create the prompt
Combine all the above into a single prompt, this can look something like this:-
Create HTML code to paste into an online code editor, this code editor has strict guidelines that you have to follow, these are: only ever use regular html with inline tailwind, if state management is needed, use CSS-only Tailwind group variants, do not include a <head>, replace <body> tags with <div>, do not ever use <style>, <link>, or <script> tags as these will be removed by the code editor and will break the code otherwise.
Now, create a landing page for an innovation campaign at [company_name], think of their identity, they want to collect ideas that have the potential to enhance company processes and anything else that is beneficial to them. Include a button that I can link to a form, to submit ideas. Also, create a thank you page, that I can link to after the submission has been completed. Style the html in a way to make it look professional, modern and most important, consider the uploaded style guide to align with the online presence of the company.
-
Copy & Paste Into Editor
Important details, otherwise it won’t work.
The code editor already has a feature built-in that will do these steps, explained below, automatically, but if you paste your code and it doesn't work for whatever reason, make sure it aligns with the format, explained below, first.
HTML Structure
Having a basic understanding of HTML greatly helps with understanding the process of creating a layout page in the ITONICS code editor.
HTML files are always structured the same, in containers.
- DOCTYPE tag
- HTML beginning tag
- HEAD beginning tag
- HEAD section
- HEAD ending tag
- BODY beginning tag
- BODY section
- BODY ending tag
- HTML ending tag
Editing the Generated Code
To avoid unnecessary complications, before doing these steps, check whether or not the code editor already removed the <head> section and renamed the body-tags to div.
Check as well, if the code contains any disallowed tags. These should be removed, if not they will cause complications later on:
<style>, <link>, <script>
We only need the BODY container and we have to rename the tag-name to div, that means we have to do a couple of changes to our code before it will display properly.
The steps are in order of where you will find the elements in the code, starting from the very top:
- Remove
<!DOCTYPE html>tag - Remove
<html …>tag - Remove
<head> … </head>section including the tags
Note: don’t get it confused with<header> … </header>, this one is fine. - Replace
<body …>with<div …> - Replace
</body>with</div> - Remove
</html>
Now the first word in the editor should be <div> or <div …> and the last word should be </div> or </div …>.
Editing in the Preview
Editing in the preview [1] is sometimes easier than going through the code and finding the exact container to edit.
Simply click on an element of the page [2] and change its properties on the right [3].
Editing the Code
The Code can be edited like any other HTML file. Just keep the restrictions of the code editor in mind. Anything other than regular HTML with Tailwind could cause issues.
Warning: Images may not display correctly when copying Site code or due to network restrictions
If you copy Site code from one Workspace to another, embedded images are not automatically transferred to the target Workspace.
In addition, images may not be displayed correctly for end users if access to required domains is restricted by the customer’s network. In such cases, the domain itonics.site must be whitelisted by the customer’s IT.
To resolve issues:
- Re-upload all images manually in the Site Preview of the target Workspace before saving
- Ensure that
itonics.siteis accessible within the customer network (whitelisting may be required) - Optionally validate by opening a public site with images outside the corporate network
This is a temporary workaround until a permanent solution is released.
Page Setup — Form
Forms are the connection to the ITONICS ecosystem, use them to submit and create elements in the system.
All elements created with a Site form will have that Site as their “Site source” property value. The “Site source" can be changed if an Element was submitted via the wrong site accidentally.
Create a Form Page
Follow the steps below to create, configure, and implement a form-page into a layout-page, to make them accessible.
- Go to Pages
- Press the blue “+”
- Select Form
- Enter a name
- Press enter, you will be redirected to the form configuration
Form Configuration
Select an element type existent within the workspace, all properties from all element types are available for you to include in the configuration of the form, make sure to use the ones that are tied to the element type you are creating. to automatically display them in the element details tab.
Creating new properties in the Form is also possible, but they have to be added to the details in the Element Configuration of that element type after.
Note that must-have properties are not required, since a default value has to be set in the element configuration, but as best-practice, it is recommended to always include them, if semantically reasonable.
To learn all about the form configuration, follow the steps below.
- Choose an element type
If none fits, create a new one in the Element Configuration.
The form will be preconfigured with all must-have properties. - Configure the form
The configured form can look something like this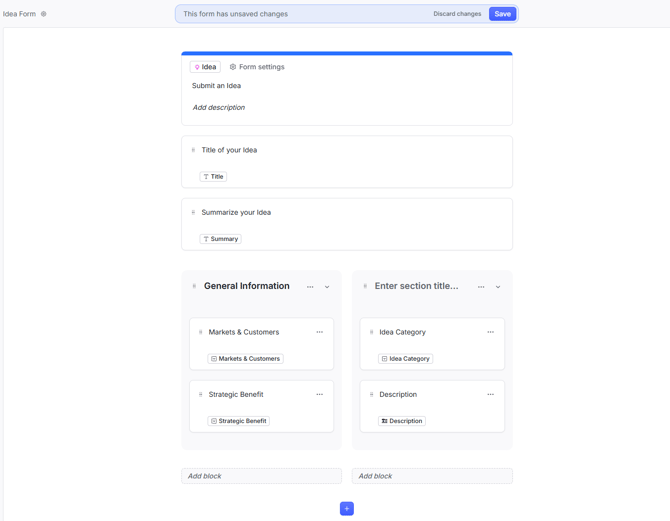
- Save changes
- Press on the cog in the top left next to the Form name to rename the slug or the page if needed.
- Form settings
There are several settings for a Form page to specify confirmation behaviour, what happens with created elements etc.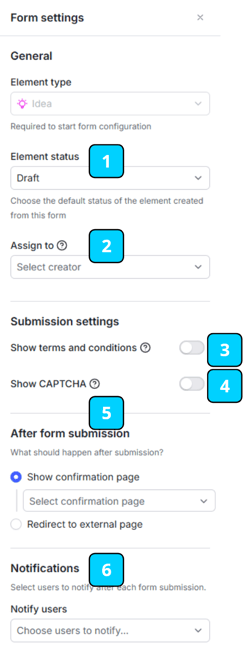
- Explanation, see table below
- Link the form in a Layout-Page
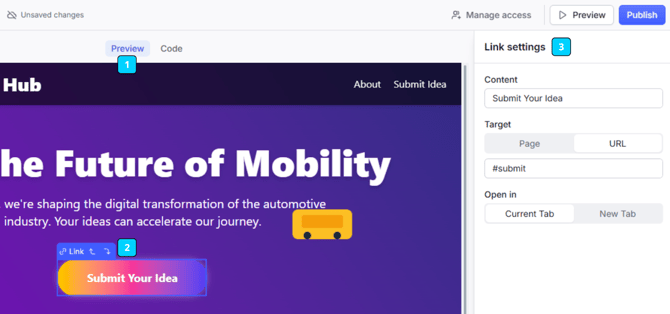
To make the Form accessible, it has to be included in a hyperlink on a Layout-Page.- Go to any Layout-Page
- In the preview window, click on any hyperlink container
- On the right side settings, it should say “Link settings” in the top, there, set the Target to Page and choose your Form-Page.
Form settings
|
|
Name |
Description |
|---|---|---|
|
1 |
Element Status |
Set the status of the newly created element |
|
2 |
Assign to |
The assigned user will be the creator of the element. If no user is assigned, the element will be created by the current user if logged in, or by Anonymous if not logged in. |
|
3 |
Show terms and conditions |
Display terms and conditions that users must accept before submitting |
|
4 |
Show CAPTCHA |
Add CAPTCHA verification to prevent spam submissions |
|
5 |
After form submission |
Specify confirmation behaviour
|
|
6 |
Notifications |
Select users to notify after each form submission |
Your Form Page is now set up and ready to be used!
Publishing
The last step is to publish the Site and make it available to whomever is needed.
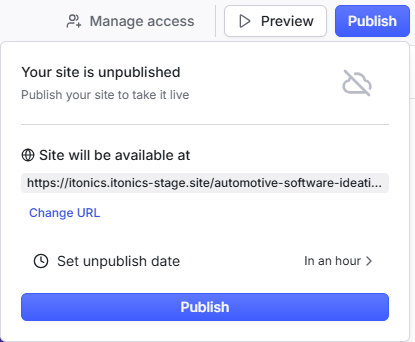
- Press Publish in the top right corner
- Keep or change URL of the Site:
Change URL slug - Set unpublish date, choose from:
Never, In an hour, In a day, In a week, or select custom date - Press Publish again
- Manage access
Make sure the right users have access- Add specific users
Users must be part of the workspace - Configure general access
- Public
Anyone with the link has access - Workspace Members
All members of the workspace has access - Private
Only invited users have access
- Public
- Add specific users
Note that public Sites cannot be found via web search yet (coming soon), they are not being indexed for search engines per default.

Congratulations! You now published your Site. It is ready to be accessed via the link and all submitted elements will appear in the workspace!