![ITONICS-Logo-Night-Blue-2021.svg]](https://www.itonics-innovation.com/hubfs/ITONICS-Logo-Night-Blue-2021.svg)
Read here more about:
1. Invite new users with local accounts
2. Authenticate and create new users with SSO
4. Role & Workspace Assignment via SSO
5. Populate user attributes via SSO
Invite new users with local accounts
To invite users individually, open the Users & Invitations page of the Organization Settings. You get there by clicking the workspace name in the top left and then Organization Settings in the menu that opens; the settings open in a window over your Innovation OS, with all settings pages listed in the sidebar on the left.
Note that you have to have enough permissions to see the organization settings.
The Users & Invitations page opens on the Users tab, which lists everyone in your organization with their first name, last name, email address, the date they joined, their status, the workspaces they belong to, when they were last seen, and their organization role. Use the search field, Sort by and Filter to narrow the list down, and the pagination at the bottom to move through it.
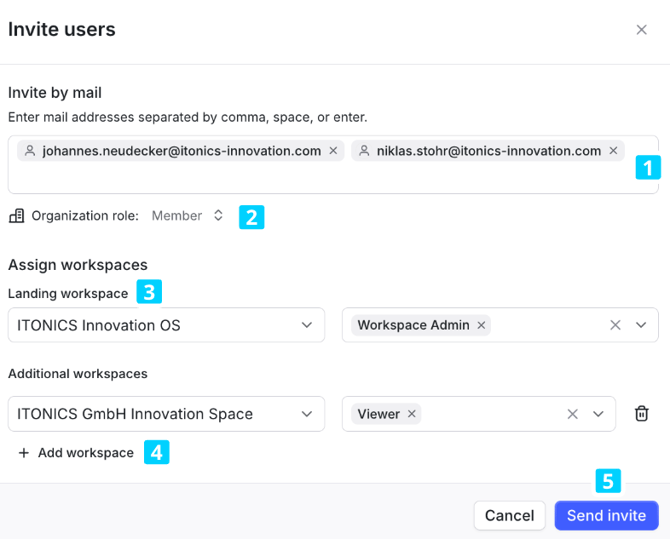
To invite a user, click Invite User at the top right. A dialog opens where you can enter one or more email addresses — separated by comma, space, or enter [1] — and set the Organization role [2]. Under Assign workspaces, pick the Landing workspace [3] and the role(s) the user should have there, and use Add workspace to give them access to further workspaces with their own roles [4]. The landing workspace opens automatically when the user logs in for the first time. After that, the system will always remember the last workspace they visited and open that one on future logins. Once done, click Send invite [5].
Note:
- An invitation is valid for 7 days.
- You can, at max, assign 5 user roles per workspace.
- Once a user accepts the invitation and logs in for the first time, they automatically gain access to all public workspaces with the default role. Therefore, you only need to add them to one public workspace during the invitation. Unless they should also access a private workspace or require a role other than the default.
To see the status of the invitations, switch to the Invitations tab next to the Users tab. Here, you will find an overview of all invited users (with a pending or expired invitation). The list contains the email address, invitation date and status, with further actions available from the menu at the end of each row.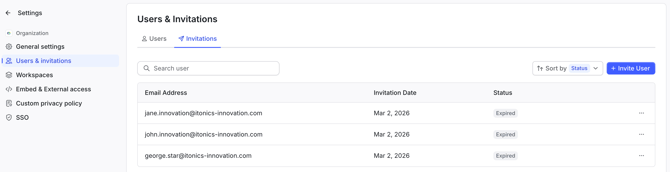
If you - as a Workspace Administrator - want to correct the role assignment later, navigate to the respective workspace settings and adjust the role given.
Please note that the "Invite User" button does not appear when you have SSO enabled. Via SSO, every authenticated user from your active directory can directly log in to the system with their company credentials.
If you want to learn more about user management in general, please read this article.
Authenticate and create new users with SSO
Single Sign-On (SSO) allows users to access ITONICS using their corporate credentials via a SAML Identity Provider (IdP). Once SSO is activated, users gain access by visiting the system URL and authenticating through the SSO login.
User login flow
- User navigates to the ITONICS login page.
- Click the SSO login button (label is configurable during setup, e.g., “Log in with Microsoft Entra ID” or “Use Company Login”)
- The user is redirected to your organization's Identity Provider (e.g. Microsoft Entra ID (formerly Azure AD), ADFS, OneLogin).
- Upon successful authentication:
- A user account is created with the role Member.
- Attributes imported: Email, First Name, Last Name.
- User is directed to a default public workspace.
Note: Access to private workspaces must be granted manually after the user's initial login or workspace allocation is configurable via Role & workspace assignments via SSO.
SSO configuration steps
Important: Attribute mappings must be entered before metadata can be fetched. Use placeholder values initially, then update them after metadata retrieval.
Go to Settings > SSO. Execute the following configuration steps:
- Title & Label: Set a Title for your IDP and define the Label for the SSO Log in Button. This label will be displayed on the Login Page. (1)
- Attribute Mapping (Placeholders): Before metadata can be fetched, input temporary values (2):
- Email: placeholder-email
- First Name: placeholder-firstname
- Last Name: placeholder-lastname
- Metadata Configuration: Choose the Metadata Configuration Type and upload a Metadata URL or a Metadata XML File Content. (3) You get the Metadata from your Active Directory. For instance, if you use Microsoft Entra ID (formerly Azure AD) you can retrieve the Metadata from the SAML Certificates section in the respective Enterprise Application. The URL should look as follows: https://login.microsoftonline.com/{tenant-id}/federationmetadata/2007-06/federationmetadata.xml?appid={app-id}.
- Signing & Encryption (optional): Two checkboxes let you harden the SAML exchange between ITONICS and your identity provider. Enable Sign SAML requests so that your IDP can verify that an authentication request carries the expected signature. Enable Encrypted SAML assertions to require your IDP to encrypt all SAML assertions with the public key that this system provides. Only activate these options if your IDP is configured to support them, otherwise the login will fail.
- Save the applied configuration (4)
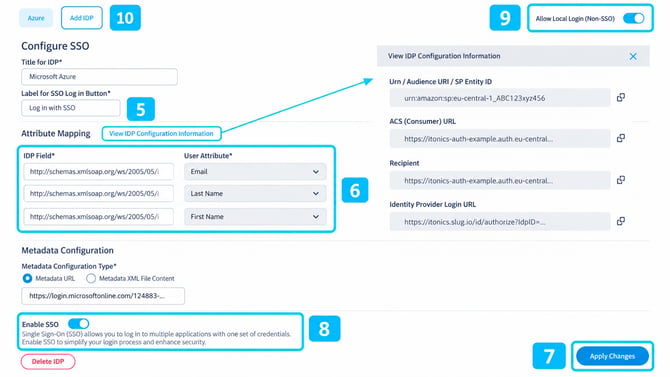
- Based on your applied configuration – the IDP Configuration Information are generated (5)
- Your IT Team has to import the metadata to the Active Directory Federation Services (ADFS). Continue with the next step only once this is done!
- Attribute Mapping (6): Replace the placeholders from above. Map the attributes from your identity provider with the user attributes in ITONICS. Use the fully-qualified URIs provided by your IDP (e.g. "http://schemas.xmlsoap.org/ws/2005/05/identity/claims/givenname" instead of just "givenname"), which you can obtain from the metadata XMl.
- Once you've completed the configuration, click Apply Changes to save your organization's SSO settings. (7)
- Enable SSO for your organization via the slider in the bottom-left corner. (8)
- You can also decide if you still want to allow Local Login (Non-SSO) with standard login credentials. (9) SSO needs to enabled first to activate the toggle.
- What users see when local login (non-SSO) is disabled depends on how many IDPs you have configured. See Behaviour with local login disabled below.
- If you want to add another IDP you can do so by clicking on the +Add IDP button. (10) You can add up to three IDPs.
- For Microsoft Entra ID (formerly Azure AD) users:
- Multiple Microsoft Entra IDs can be connected as separate IDPs if required.
- Each Entra ID requires a unique Metadata URL.
- A distinct login button will be displayed for each Entra ID
- For Microsoft Entra ID (formerly Azure AD) users:
Behaviour with local login disabled
One IDP configured: all users are redirected automatically to the identity provider. No login form is shown, so no email login option appears. This applies to every role, including organization admins — there is no admin exception.
Two or more IDPs configured: the login page is still displayed, showing a button per IDP. Users who attempt to log in by email receive a notice that their account is managed via Single Sign-On (SSO).
After changing this setting: users who visited the login page before the change may continue to see the previous version from their browser cache. Clearing the browser cache, or opening the login page in a new private window, shows the current behaviour.
Testing before you disable local login: Keep Local Login (Non-SSO) enabled until the SSO login, the organization role assignment and the workspace assignment have all been confirmed with a test user. A configuration error is usually only visible once the SSO login button is clicked, and as long as local login is still enabled you can sign in with your email address, correct the configuration and try again.
With only one IDP configured and local login already disabled, every user is redirected to the identity provider automatically — organization admins included — so an incomplete SSO configuration can no longer be corrected from inside the system. Run the test login in a private browser window while an admin session stays open in a separate window, and switch off local login only once login, roles and workspace assignments all behave as intended.
Role & workspace assignments via SSO
Automatically manage user roles and workspace memberships by leveraging your organization’s SSO (Single Sign-On) setup. By mapping specific attributes from your SAML configuration to roles and workspaces in ITONICS, you can ensure that every user gets the correct level of access from the moment they log in.
How It Works
-
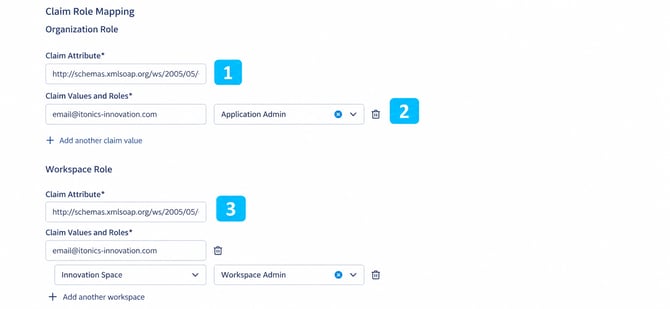
Add a Claim Value for the Organization:
- In the configuration screen, locate the Claim Attribute field.
- Input the claim attribute received from your Identity Provider (IdP). This value serves as the key for mapping to your ITONICS organization roles.
-
Map Claim Values to Organization Role:
- In the Claim Values input field, enter the specific claim value that corresponds to the user’s profile.
- Select the appropriate organization role that should be assigned when the claim value is detected.
-
Assign Workspace Roles:
- Use the same approach to map claim values to roles for one or multiple workspaces within your organization.
- This step ensures that users are automatically granted the correct permissions in the designated workspaces based on their SSO attributes.
Populate user profile attributes via SSO
Enhance user profiles with automatically populated data from your SSO or Identity Provider. These additional fields can be used for future functionality, such as permissions management, group assignments, or custom automation.
How to Configure Dynamic Attribute Mapping
-
Click on "Add Attribute":
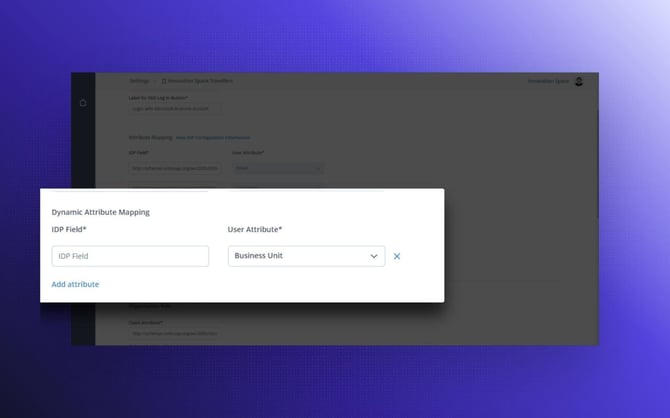
- Under the Dynamic Attribute Mapping subtitle on the User Profile Attributes configuration page, click the Add Attribute button to start the mapping process.
-
Select the IDP Field:
- In the configuration form, locate the field where you can specify the IDP (Identity Provider) Field.
- Enter the claim attribute that your IdP sends. For example:
http://schemas.xmlsoap.org/ws/2005/05/identity/claims/department
-
Map to a User Attribute:
- Next, select an existing user attribute or create a new one that should be updated with the value received from the IDP Field.
- This mapping ensures that the corresponding field on the user profile is automatically filled and updated upon login.
Changing a user's role
Once you have invited a user, you can still further change the roles per workspace or make any user the admin of your Innovation OS.
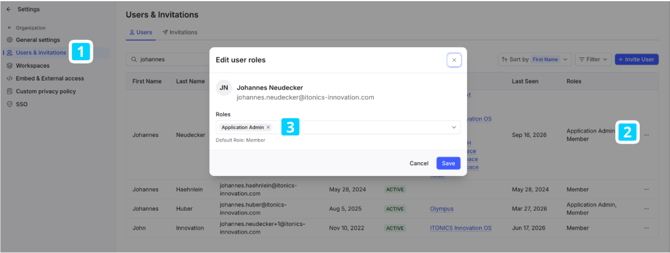
To change a user’s role at the organization level, open the Users & Invitations page of the organization settings. Find the user you want to change, open the actions menu at the end of their row, and assign the role you want to give them.
If you want to change a user's specific role in a workspace, open the Workspaces page of the organization settings. Here, you will find all your workspaces. Open the respective workspace to reach its workspace-specific settings page.
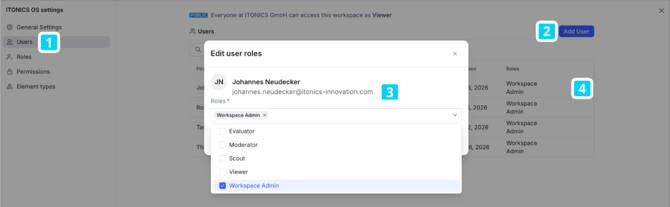
Go to the Users page, search for the respective user, and open the actions menu at the end of their row. Now, you can assign them another role.