1️⃣ The Grid View — Finding and Filtering All the Content of Your Innovation OS
The grid view and in specific the "All Elements" view is the heart of the ITONICS application. Here you find all the content that exists throughout a workspace.
Table of contents
The grid visualization
The "All Elements" grid view contains all the elements that are in a workspace, if not specified otherwise in the views filter. Furthermore, this provides to option to find content pieces of interest fast and easy.
The "All Elements" is a default view of every workspace, unless your workspace admin deleted it, and it can be directly accessed from the main navigation menu on the left of the application [1].
If there is no "All Elements" view, not to worry, simply go to any grid view and adjust the filter in the top right corner to include all elements in the workspace.
The grid view is perfect for browsing ideas and getting a overview of the elements in the workspace.
Note: Overwriting the filter via save will change the filter for this view for everyone as it is attached to the view, same with sorting.
If you need a specific, personal, filter regularly, consider pressing save as new and saving it as a private view.
On top of the screen, you will find the search and filter menu.
Create & customize the grid view
To utilize the grid view to its fullest potential, custom grid views can be created.
Press the plus icon [1] next to "Workspace views" → "View" [2] → "Grid" [3] and fill out the form.
Think of a fitting name for the view, select element types that should be included from the start, then select a folder and if you want to configure the view before everyone can see it, select "Make Private" [4]. Hit "Create" [5].
Views are mostly interchangeable, the key is that a visualization is always attached to a filter which selects the elements to be displayed.
After creating the view, specify the filter [6].
Click on filter in the top right to change the displayed content according to your use case. Once you changed your filter section, you can save your view by clicking on “Save as new view”, if you are trying to change the default "All Elements" view and "Save changes" or "Save as new view" for any custom view, in the top right corner.
Learn more about the filter here.

Selecting elements
You can now select all content elements at once (tick the box in the left corner) and, subsequently, perform bulk actions. Or, you hover over the different element cards, find a checkbox to the top left of each card, and select interesting content this way.
Afterward, you can, for instance, copy content to another workspace if you have the necessary permission.
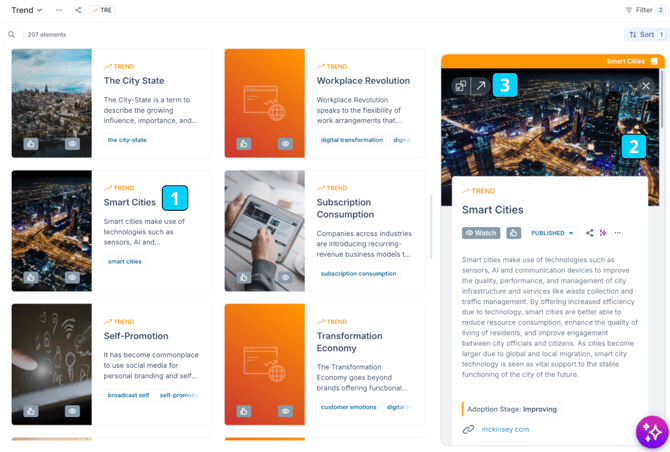
If you want to explore the details of a content card, click on its title [1]. The element will open in a stack view to the right side [2]. From the right side, you will find all the information about this element and can edit it if you are allowed to do so. You can open multiple elements simultaneously in the stack view.

You can further expand your view by two options [3]:
1. Expand/Collapse the Stack: Click the first button to the upper left on the stack card (window resize icon) to expand or collapse the Stack. This widens/shrinks the display of the content card.
2. Open the detail page in a new tab: Click the second button to the upper left (diagonal arrow icon) to open the detail page of an element in a separate browser tab.
To close the Stack, click the "X" button on the upper right part of the Stack card in front to close it. Hovering the button with more than one card on the Stack opens an additional button to Close All.
Bulk actions
The grid visualization also support bulk actions. Learn how to below.
Bulk actions, like all other actions, depend on your permissions.
Only roles with enough permissions can delete and smart copy.
- Navigate to any grid view [1]
- Hover over an element card [2]
- Click the checkbox in the top left of the element card [3]
- Checkboxes for all other element cards will appear
- Notice in the bottom of your screen a bar opening [4]
This bar supports multiple bulk actions- on the left most side, (de)select all [5]
- Open in stack [6]
- Smart copy [7]
to copy to another workspace - Watch [8]
to watch all selected elements - Delete [9]
to bulk delete elements
