- How to Create Your First Roadmap and Its Layer Structure
- Adding Activities, Connections, and Milestones to your Roadmap
- Navigating the Roadmap
- Managing and Integrating Roadmaps
How to Create Your First Roadmap and Its Layer Structure
The first step is to enter the roadmap tool from the left main navigation menu [1]. Once you click on Roadmap, you will land on the overview page that contains all already created roadmaps [2]. By clicking on a title, you will enter the specific roadmap.
When you want to create a completely new roadmap, find the "Create Roadmap" Button at the bottom right [3]. Clicking on it opens a dialogue where you can select from the existing roadmap templates, or you can just start with "Blank Roadmap". Select the required roadmap template, add a name for your roadmap, and click on Create roadmap [4]. If you want to learn more about the roadmap templates, read on here.
On this first roadmap overview page, you will also find two tabs next to Roadmaps: Activities and Milestones. Both lists will show you all the activities and milestones that have been added to all roadmaps. This gives you also the option to delete activities and milestones globally, i.e., they will be deleted from all roadmaps.

As a next step (when selecting blank roadmap), you will land on a blank roadmap that contains a time beam and the name of your roadmap on top [5]. You can now add different layers that add rows to your roadmap and give your roadmap a certain structure.
Any new roadmap starts with a two-month time frame around your creation date. However, the timeline automatically adjusts to a maximum time range according to the elements placed on it. If you need to expand the horizon of a roadmap without having any activities attached to that space yet, consider setting a milestone far ahead or back in time.

To add a new (top-level) layer, navigate to the bottom right Create Button, hover on it, and click "Create New Layer" to add a new layer to your Roadmap [6]. To now add titles to your layers, go to the layers on the left. Hover over them and find the pen icon. Clicking on it allows you to enter a title for each layer [7]. Confirm with enter. Next to the layer title, you will find three dots. From the three dots, you can either delete a layer or add a sub-layer to your top-level layer. Click Add Sublayer to create a Sublayer and again use the pen icon to name it respectively.
You can also reorder Layers after you have created them to suit your needs.
Read more here.
Adding Activities, Connections, and Milestones to your Roadmap
Once you have set the basic roadmap layer structure, you are good to add activities per layer and milestones to your roadmap.
Activities are the basic objects you place on the layers of a roadmap. Activities can be connected with each other (which is visually represented by a line) and linked to the other content elements from your Innovation OS. They support the progress towards milestones. Milestones, in contrast, represent key events or goals that you want to achieve at a certain point in time. They are added independently of the layer structure globally below the time beam [1].

On activities
To add an activity, you can either switch to the "Quick Editing" Mode [2]. Clicking on the pen icon at the left allows you to enter this mode and add a new activity directly to the right layer. You just need to click on a row and at a respective time and the system adds an activity to the roadmap [3]. Name it and add it to the roadmap by pressing enter. You can also now switch the timeline of the activity interactively. Either you move the whole activity block to a new time horizon or you can pick the start or end of the activity block to change the start or end date [3].
When you do not want to use "Quick Editing", you can also add a new or already existing activity by hovering on "Create" at the bottom and selecting the respective action [3, bottom]. Once created, you can click on the activity and open it in the right stack view to change the title, layer, and date range (hover on it and edit it) [4]. Or, you can add an activity type that adds a visual component to the roadmap display, a textual description, connections to other activities, or relations to other content elements from your Innovation OS (i.e., the content elements outside your roadmap, [4]).
To delete an activity, find the "Remove Activity" button at the bottom of the activity stack view [4], e.g., you click on an activity of the roadmap and the stack view opens where you will find the remove option.
Note: Removed items are not deleted. You can restore removed items to the Roadmap by clicking on Add existing Activity or Add existing Milestone from the Create button in the bottom-right corner of the Roadmap and choosing the removed item from the list.
⚠️ Note that a single activity can be placed on multiple roadmaps. If several initiatives rely on the same real-world activity (e.g. R&D of a particular Technology), they should be represented by the same activity on the roadmaps. That way, if you or a team member move the activity on one Roadmap, the impact will be clear on the others as well.
On Connecting Activities
To connect an activity with another activity on the same roadmap, hover over an activity. A circle appears beside the right end of the Activity. Drag and drop that circle onto another activity to create a connection between the two. The made connection will be displayed in the stack view of both content elements [4].

To remove any connection between activities, click on an activity to open the stack [4]. Scroll to Connections to view previous or upcoming Activities. Click the X on the activity you want to remove the Connection.
On Milestones
Other than activities, milestones sit on top of a roadmap [1, above]. That is why, you can only add a milestone from the bottom right Create button [3]. You can choose between adding an already existing milestone (from another roadmap) or creating a new milestone. Simply hover over the create button and select the appropriate action.
A pop-up appears that asks you to provide a date, title, and milestone type. Add the information and click Create Milestone. The milestone will now be added to your roadmap.
To edit a Milestone, click on its name to open it in the stack. Edit attributes like date, title, description, or Milestone type. Click on Remove Milestone (see A below) to remove the Milestone from the current Roadmap. If the Milestone is on other Roadmaps, it will still be displayed on them.
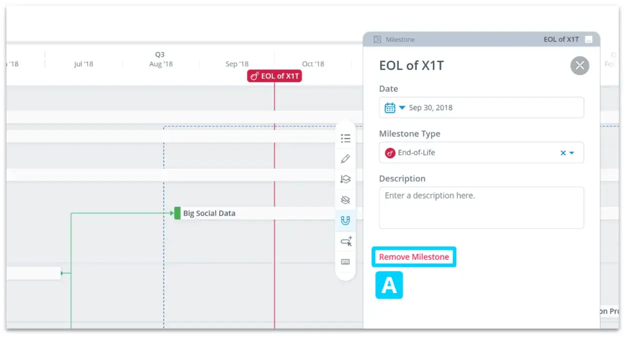
Caution: Editing the attributes of a milestone that is used in multiple Roadmaps will automatically change it in every Roadmap.
Navigating the Roadmap
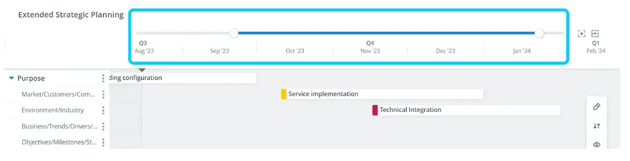
Every Roadmap has a timeline on top of the visualization. Drag-and-drop the round handles to pick a date range for the Roadmap to zoom into. Once zoomed in, you can drag and drop the blue range bar as needed to scan through time. Next to the handles, you will find the Fit to View and Center Around Now Icons. Fit-to-View brings you back easily to display all activities on the Roadmap. Center Around Now will center a zoomed roadmap around the current date.
The current date is displayed with an arrow and a dotted line (cf. Aug '23 in the picture below).
Besides the timeline handles, you can also use the mouse wheel when navigating to zoom in or out. Within the "Quick Editing Mode", use Space + mouse wheel.
You can also move a fixed time horizon on the roadmap by using your mouse drags.
Managing and Integrating Roadmaps
Roadmap permissions
The roadmap permissions are handled per workspace.
| Workspace-Level Roles | ||||||
| Permissions | Workspace Admin | Moderator | Evaluator | Scout | Viewer | |
|
View all Roadmaps, Activities, Layers, Milestones
|
x | x | x | x | x | |
|
Create/edit/delete all Roadmaps, Activities, Layers, Milestones
|
x | x | ||||
|
Edit Milestone and Activity Types
|
x | x | ||||
|
Configure Roadmap Layer
|
x | x | ||||
Change the Layer Order and Visibility
If you want to change the order of your layers, find the second icon in the roadmap menu to the right [1]. Clicking on it will show you all the layers and sub-layers. You can easily use drag and drop to re-arrange your layer structure. Below the Reorder Layers Icon, you will find the icon to "Change the Layer Visibility" [2]. This represents which layers are shown. When you de-select a layer, the layer will be hidden and also the activities added to this layer.

You will also find the following options in the roadmap configuration menu:
- Snap to Grid [3]: Magnet snapping is switched on by default. When you drag-and-drop an activity the magnet will cause snapping of an activity item at the start and end of intervals of the timeline.
- Roadmap Editor [4]: Change the title and description of your Roadmap.
- Embed Option: Allows to embed the roadmap on an external page outside the ITONICS Innovation OS (read more about it here)
- Legend [5]: The legend offers hints on used activity colors, linked entities, and used Milestone types. This is also the gateway to access the configuration of your activity and milestone types
- Shortcuts: Shows which shortcuts you can use on the roadmap
Adding and editing activity and milestone types
Activities and Milestones on the Roadmap can have different types. These help you to organize your roadmap visually using different colors and icons.
Navigate to an existing roadmap. There, click on the Legend icon in the toolbar on right of the screen [5]. You will see a gear icon in the top-right corner of the Activity Types and Milestone Types containers. Clicking on that icon will open the activity / milestone type configuration page.

In the management area, existing activity and milestone types can be viewed and edited, as well as new ones created. To create a new milestone or activity type, find the blue "Create" button at the bottom right, hover over it, and select the appropriate option. Fill out the required fields. Select a color and, in the case of milestones, an icon. Confirm with Create.
Note: Default Activity and Milestone types provided by ITONICS can not be edited or deleted.
As another option, you can also create a new milestone or activity type from an activity's or milestone's details in the stack view. When hitting the type selection, you will find at the bottom of the list, the option to create a new type.

Add Roadmaps to other Roadmaps
Placing Roadmaps onto other Roadmaps allows you to have a single Roadmap as an overview of all your innovation activities that are made up of smaller Roadmaps that can be managed by different teams.
To add a Roadmap to another, hover over the Create button, then click Add Roadmap.

In the dialog, select the desired Roadmap from the dropdown and choose the Layer you want to add it to.

Delete a roadmap
To delete any roadmap, navigate to Roadmap from the left side nav (Roadmap might be under the "More Tools" option). You will land on the overview page of all roadmaps. Use the search bar to the right or navigate individually to the roadmap you want to delete [7]. Find the trash icon to delete a roadmap [8].
