It is recommended to use V2 for all new integrations and to migrate existing setups accordingly. The full developer documentation and testing can be found HERE.
The documentation for the ITONICS API (V1) is available here. V1 remains operational for now but will be deprecated in the future.
The ITONCS API V2 allows you to:
- List, create, update and delete elements
- List and create element types
- List, add, and remove likes
- List, add, and remove files/attachments
- List, create, update, and delete users, and remove users from a space
This enables you to:
- Sync data between ITONICS and external systems
- Automatically create or update elements from external sources
- Process and analyze data outside of ITONICS
- Integrate ITONICS into automated workflows
Using the API ensures consistent data across systems and supports bidirectional data exchange.
The ITONICS API and external integration feature are available only in the Professional Plan and the ITONICS Connect product package. To try the feature for free, contact us at account_manager@itonics-innovation.com.
Table of contents
- Authentication
- Endpoints
- GET data into PowerBI
- Embed a PowerBI report into ITONICS
- GET data into Looker Studio
- Embed a Looker Studio report into ITONICS
Authentication
To use the ITONICS API, you must authenticate every request with an API Key.
Include the token in the Authorization header of your requests.
Generate an API Key
As an Application Admin, go to Organization settings from the menu in the top left corner. Then open Embed & External Access to generate an API key.
By clicking on it, you land on the organization settings page. In the Embed & External Access tab (1), click on the Create button (2) in the bottom right corner. Add an API Key Name (3) that best represents the connection you want to build, e.g., "Power BI".
Now, select the one of the following two types (5):
- Embed: With embed, you will be able to embed reports into the ITONICS Innovation OS.
- External integration: Allows you to retrieve, create, update, and delete elements as well as manage element types via the API. You can define permissions at a very granular level, specifying exactly which actions an API key is allowed to perform.
- View all elements
- View all draft elements
- View all archived elements
- Create element
- Create draft elements
- Edit all elements
- Delete all elements
- Update element type
- Create element type
- Rate

Once you hit “create”, you will see a table, consisting of the names of all external access token(s), types, API keys, status, workspace allocation(s), and the validity.
To verify your setup and start working with the API, you can now test authentication and available endpoints in the API documentation.
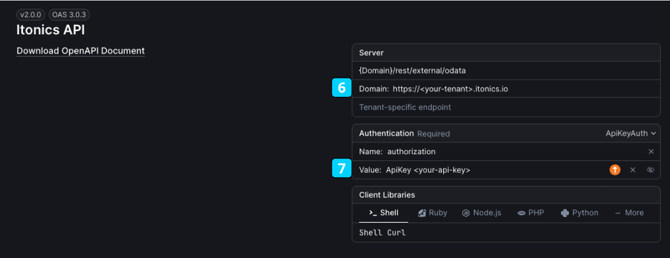
Open the ITONICS API (V2) Documentation, enter your domain (6), and authenticate using your API key (7) in the following format: ApiKey <your-api-key>
Note the following, regarding data visibility and access:
- All information within a workspace that has a valid API key can be accessed through the API by any person who has access to the API key. The API key is valid right after being generated and is only invalid, once the External Access entry in the settings are removed/rotated.
- Content in properties that have been hidden in the element configuration for the workspace can still be requested through the API.
Endpoints
All endpoints can be tested here. The following information is needed:
- the API key (column 3 in the list of the external access tokens as specified above)
- the spaceURI (column 5 in the list of the external access tokens as specified above)
- the filter query (optional) (defines the information that you want to extract)
Please note
- The current version of the OData API allows you to query element data from one specified workspace. When you select multiple workspaces in the External Access Token creation, you will find multiple OData API URLs in the row of the external access token — one for each workspace
The typical structure of an API query will have a form as follows:
https://{systemUrl}.io/rest/external/odata/v2/{spaceUri}/{endpoint}?$filter={Query}
- systemUrl: this is the identifier of your ITONICS Innovation OS
- spaceUri: this is the identifier of your workspace
- endpoints:
- "/elements": Represents the core content objects in the system. Elements act as the primary information carriers:
-
- "/elementtypes": Returns all element types defined in the workspace and allows you to create new element types:
- "/likes": Returns likes per element and allows you to create and delete likes:
- "/files": Returns likes per element and allows you to create and delete likes:
- "/attachments": Returns attachments per element and allows you to attach and detach files:
- GET: List attachments per element
- POST: Attach file(s) to an element
- DELETE: Detach file(s) from an element
- "/watches": Returns watches per element and allows you to add and remove watchers:
- GET: List watches per element
- POST: Add watch(es) per element
- DELETE: Remove watches per element
- "/comments": Returns watches per element and allows you to add and remove watchers:
- GET: List comments per element
- POST: Add comments per element
- PATCH: Update comments per element
- DELETE: Remove comments per element
- "/views"
- GET: List views (only pages for now)
- GET: LIst a specific view via URI (only pages for now)
- POST: Add views (only pages for now)
- PATCH: Update views (only pages for now)
- DELETE: Remove views (only pages for now)
- "/roles": Lists roles available for a workspace/space:
- GET: List roles available for a space
- "/users": Manage users of a space:
- GET: List users
- GET by URI: Get a single user
- POST: Create users
- PATCH: Update users
- DELETE: Delete users
- DELETE: Remove users from a space
- Query: the syntax of your filter query (optional, see below)
Examples of filter queries
A filter query typically consists of three parts:
- the ITONICS property you want to filter for (this is defined individually by the Workspace Administrator),
- the operator how the results should match, and
- the values
For instance, if you want to extract all "Ideas" from a workspace, your query would look like this:
https://{systemurl}.io/rest/external/odata/v2/{spaceUri}
/Elements$filter=elementType eq 'Idea'
elementType explains that the attribute we are looking for is the element type.
eq expresses the property should equal to the value 'Idea'.
Therefore: we are searching for all Elements whose elementType is Idea.
List of operators, meaning, and an example:
- eq, equals, $filter=elementType eq 'Idea' (gets all content of type idea)
- ne, not equals, $filter=elementType ne 'Risk' (gets all content that is not of type risk)
- contains, $filter=contains(elementType,'tech'), gets all content that is of any type containing 'tech' in their titles
- gt, greater than, $filter=createdOn gt '2023-06-25 16:00' (all content created after '2023-06-25 16:00)
- ge, greater than or equal, $filter=createdOn lt '2023-06-25 16:00' and createdOn ge '2023-06-03 12:00' (all content created before 2023-06-25 16:00 and at or after 2023-06-03 12:00)
- lt, less than, $filter=createdOn lt '2023-06-25 16:00' (all content created before '2023-06-25 16:00)
- le, less than or equal, $filter=createdOn lt '2023-06-25 16:00' (all content created at or before '2023-06-25 16:00)
- rawFieldValues, setting this query parameter to 1 will output the raw field values, this might be important for RTE fields.
"&rawFieldValues=1"
A list of more operators can be found here.
You will see that you can also combine multiple filter criteria by using logical operators, such as, and, or, not
List of properties, meaning, and an example:
- elementType: type of the element, $filter=elementType eq 'Idea' (gets all content of type idea)
- createdBy: the content creator, $filter=createdBy eq 'jane.innovation@itonics-innovation.com' (all content from the user jane.innovation@itonics-innovation.com)
- updatedBy: the person last updated the content, $filter=updatedBy ne 'jane.innovation@itonics-innovation.com' (all content that was not updated by the user jane.innovation@itonics-innovation.com)
- createdOn: the time content was created, $filter=createdOn gt '2023-06-25 16:00' (all content created after '2023-06-25 16:00)
- updatedOn: the time content was last updated, $filter=updatedOn gt '2023-04-05 16:12' (all content last updated after '2023-06-25 16:00)
- status: the publication status (archived/draft/published), $filter=status eq 'draft' (all content with the publication status draft)
- label: the title of content, $filter=contains(label,'Technology') (all content that has 'Technology' in its title)
Custom properties are filtered by field URI using the properties/<uri> key. This is supported for select, multi-select, hierarchical select, date, and number fields.
- select / multi-select / hierarchical select: matched by option label; for multi-valued fields, a match occurs when the value is present. e.g. $filter=properties/fEVHVi163zAaKHV eq 'Article'
- date: use the format 'YYYY-MM-DD HH:MM'. E.g. $filter=properties/<uri> gt '2024-06-01 00:00'
- number: filter on the numeric value directly. E.g. $filter=properties/<uri> ge 100
Note:
- For combining multiple filter requests, you can combine those using 'and', e.g., $filter=createdOn gt '2024-06-01 00:00' and elementType eq 'Ideas' (will return all ideas created after June 01, 2024.
Curation options
Further, you have the option to manipulate the data extraction by sorting, pagination, and result limitation.
-
Sorting Results
You can sort the results of your filter queries using the $orderby parameter. By default, sorting is in ascending order, but you can specify the order explicitly: $filter=elementType eq 'Technology'&$orderby=label asc -
Pagination
Results are returned in batches of 100 by default. To navigate through paginated results, use the $skiptoken provided in the response. This token will direct you to the next batch of results:{"nextLink": "https://{systemurl}.io/rest/external/odata/v2/{spaceUri}/Elements?$skiptoken=abc123"} -
Result Limits: If you need more than the default 100 results, use the $top parameter to specify the number of records to retrieve: $filter=elementType eq 'Idea' and createdOn gt '2023-06-15 12:00' and status eq 'archived'&$top=100
GET data into PowerBI
After following all steps in this section, you will have one table in PowerBI containing all requested elements with all properties.
Setting up the API credentials as PowerBI parameters
To GET the data to Power BI, open the PowerBI desktop app. Start creating a new blank report. To further process the data, you need to connect PowerBI with your ITONICS Innovation OS.
To connect ITONICS to PowerBI, you must have access to the desktop version of PowerBI. The web-based interface does not allow for defining web (API) calls, which is required as described below.
In this step, you will need:
- API key (authorization key), see here
- URL of the OData API
- [Optional custom] Filter query — this defines the information that is to be requested
Now in PowerBI, in the report that you want to use, follow these steps:
- Go to Home tab > Transform data > Transform data

- In the new modal, go to Home tab > Manage Parameters > New Parameter
Now we will set up the API authorization and the filter query, which defines what data will be requested.
Set up the following parameters:- URL
Enter your URL in the following format in the Current value field:https://{systemUrl}.io/rest/external/odata/v2/{spaceUri}
The spaceURI can be copied and pasted in Embeds & External Access page in the Organization settings. Simply go to the In Workspace column.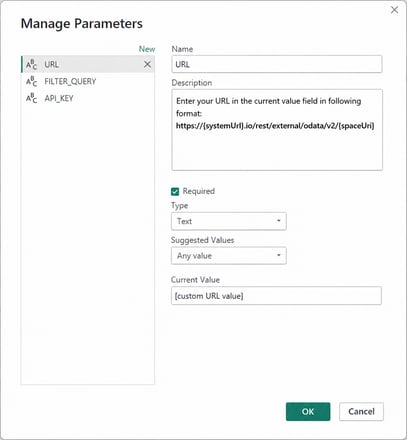
- FILTER_QUERY
Set the filter query to define what data will be requested, to just GET every element in the workspace, copy paste the text below and paste it in the respective field.
Current value-field:/Elements?$top=100
- API_KEY
URL and api key represent your authorization the ITONICS system, you will need to replace the [custom_api_key] token in the screenshot below, with your API key that you created and that is stored in the External Access settings.
The final text in the Current Value field in PowerBI could be something like this:ApiKey A7fQ9mX2ZkR4sB8NwC0EJt6DVaL1H3uP5YgKcM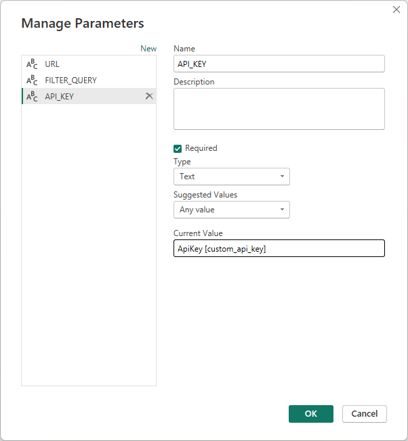
- URL
- fnGetElementsPage
Now all custom parameters are set and your setup should look something like this (see image below) with only the three parameters set.
To finish the setup we now need to create the function which creates, executes and receives the API GET request.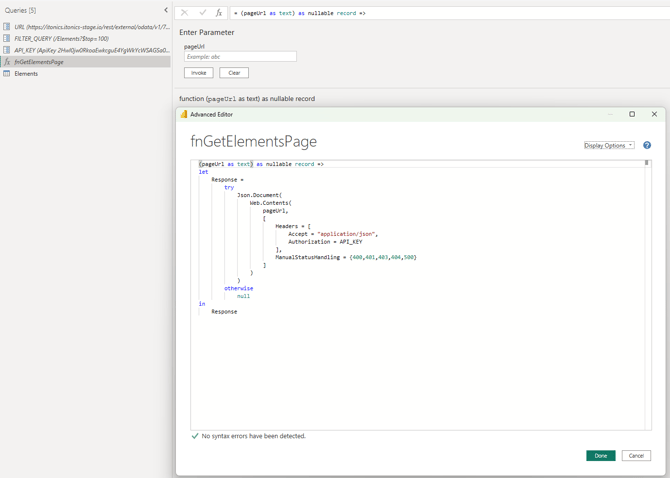
- In PowerBI: Navigate to the same window where you created the parameters.
- On the left side query navigation, press right-click > New Query > Blank Query, this will create a new M Power Query
- Change its name to: fnGetElementsPage
- Press right-click > Advanced Editor, an empty window, like shown in the image above, will be displayed, paste the following code in this editor window.
-
(pageUrl as text) as nullable record =>
let
    // 1. Identify the static Base URL.
    BaseUrl = URL,

    // 2. Break down the incoming dynamic URL (nextLink) and the Base URL
    UrlParts = Uri.Parts(pageUrl),
    BaseParts = Uri.Parts(BaseUrl),

    // 3. Calculate the Relative Path (The difference between the full path and base path)
    // We remove the Base Path from the Full Path to get the segment relative to the root
    RelativePath = Text.TrimStart(Text.Replace(UrlParts[Path], BaseParts[Path], ""), "/"),

    Response = try
        Json.Document(
            Web.Contents(
                BaseUrl, // <--- This is now STATIC (assuming 'URL' is a constant/parameter)
                [
                    RelativePath = RelativePath,
                    Query = UrlParts[Query], // <--- The dynamic parameters go here
                    Headers = [
                        Accept = "application/json",
                        Authorization = ApiKey (customApiKey)
                    ],
                    ManualStatusHandling = {400,401,403,404,500}
                ]
            )
        )
    otherwise
        null
in
    Response
- Elements
Now we need to setup the code that iteratively executes this function up until every paginated element data page is in PowerBI. And to then transform this data into a single table.- In PowerBI: Navigate to the same window where you created the parameters and the function fnGetElementsPage.
- On the left side query navigation, press right-click > New Query > Blank Query, this will create a new M Power Query
- Change its name to: Elements
- Press right-click > Advanced Editor, an empty window, like shown in the image above, will be displayed, paste the following code in this editor window.
-
let
    // 1. Define URL and Query
    FirstPageUrl = URL & FILTER_QUERY,

    // 2. Run Pagination
    Pages = List.Generate(
        () =>
            let
                First = fnGetElementsPage(FirstPageUrl),
                HasElements = First <> null and Record.HasFields(First, "elements")
            in
                [
                    Elements = if HasElements then First[elements] else null,
                    NextLink = if HasElements and Record.HasFields(First, "nextLink") then First[nextLink] else null,
                    ErrorOccurred = not HasElements
                ],
        each [Elements] <> null,
        each
            let
                NextPage = if [NextLink] <> null then fnGetElementsPage([NextLink]) else null,
                HasElements = NextPage <> null and Record.HasFields(NextPage, "elements")
            in
                [
                    Elements = if HasElements then NextPage[elements] else null,
                    NextLink = if HasElements and Record.HasFields(NextPage, "nextLink") then NextPage[nextLink] else null,
                    ErrorOccurred = not HasElements
                ],
        each _
    ),

    // 3. Extract and Combine Data
    PagesTable = Table.FromRecords(Pages),

    // Combine all list items from all pages into one big list
    AllElementsList = List.Combine(List.RemoveNulls(PagesTable[Elements])),

    // 4. Convert to Table
    ElementsTable = Table.FromList(AllElementsList, Splitter.SplitByNothing(), null, null, ExtraValues.Error),

    // 5. ROBUST Expansion (Scans all rows for all potential columns)
    // Get a list of all unique field names across all rows, not just the first one
    AllColumnNames = List.Distinct(List.Combine(List.Transform(ElementsTable[Column1], Record.FieldNames))),

    ExpandedElements = Table.ExpandRecordColumn(
        ElementsTable,
        "Column1",
        AllColumnNames
    )
in
    ExpandedElements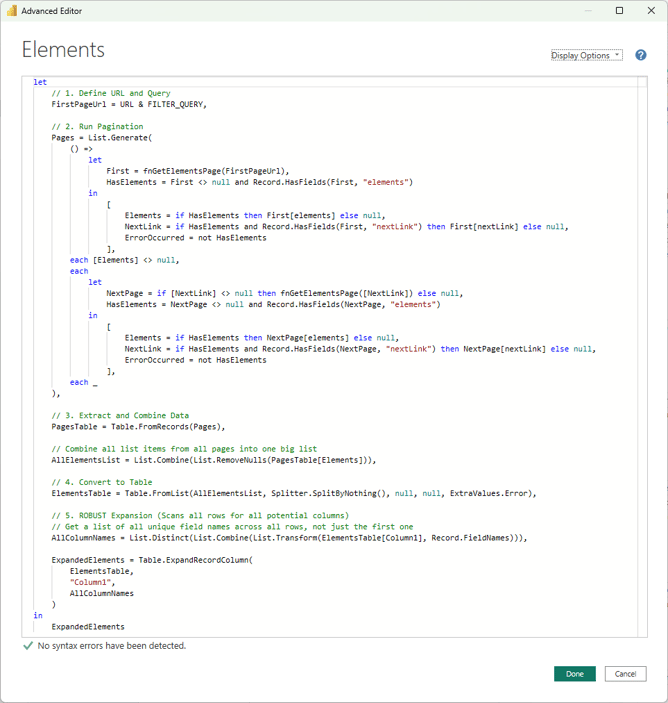
- Press right-click on this newly created Elements Query, make sure that the following two options are checked/enabled:
- Enable load
- Include in report refresh
- Now you should be able to see a preview of the full dataset
- Close & Apply
The last step is to press Close & Apply, now the dataset should load into the regular PowerBI report editor.
If no data is loading, go to Home tab > Refresh > Schema and data, this should reload all queries with the updated dataset.
Learn in the next section, how to embed this report into ITONICS, how to set up daily data refreshes and more.
Note: The resulting table will have all properties across all requested element types as unique columns, where each row represents an element. Be aware that, depending on the size of your workspace, this could be a lot.
It is also possible to split this table by element type if needed (prompt your favorite LLM if this is necessary).
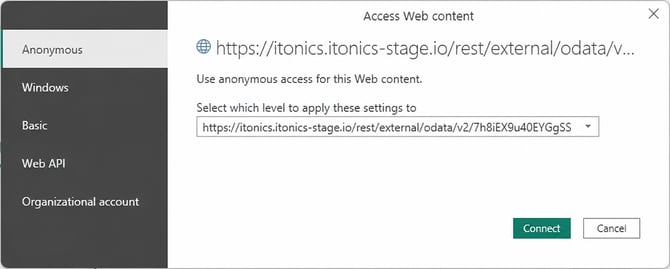
Note: When loading data from a web source (like you are doing here), PowerBI will prompt you to set Access Web content when connecting to the API for the first time.
Select Anonymous in the left side navigation (see image below) and select the URL as access level to apply this to, that you specified in the URL parameter (see below as to how that could look like).
Embed a PowerBI report into ITONICS & scheduled data refreshes
Embedding a report is as easy as pasting the report embed URL into the respective input field in the ITONICS Innovation OS. How to get to this link in the first place and setting up scheduled data updates (PowerBI paid license required), is the hard part. To only find out, where to paste the report embed URL, see the steps below, to find out how to get there (publishing & scheduled updates), see section Setting up a PowerBI report to be embeddable in ITONICS & scheduled data refreshes.
Embedding a report into ITONICS via report embed URL
Follow these steps closely.
- Enter the specific workspace where the report should be located in.
- Go to Report in the More Tools section
- In the top left, select + Embed new Report
- Select a Title
- Paste the Report URL (like:
https://app.powerbi.com/view?r=[...]) - Press Embed Report
- Now the report should display.
- You will also find the option to "Make publicly available". When you share with everyone, every workspace user with permission granted to view embedded reports finds the name of this saved view in their main menu under reports and can access it.
Note that, PowerBI reports can be access controlled, depending on your report configuration, users might have to log in to their respective Microsoft account to view a report.
Setting up a PowerBI report to be embeddable in ITONICS & scheduled data refreshes
To embed a report, it has to be published to a workspace in the PowerBI Cloud first. After that, to schedule daily data updates, a PowerBI Professional license has to be associated with that workspace.
- Publishing the report to a workspace
- Make sure there (app.powerbi.com) is a workspace already set up, where the report can be published/saved to.
- In PowerBI: go to Home tab > Publish > select a destination (workspace)
- When finished press Open '[report_name].pbix' in Power BI, continue from there
- Get the embed URL
In the PowerBI online service (app.powerbi.com):
- In the top left navigation bar, go to File > Embed report > Website or portal
- Copy Link to embed this content
- Continue as outlined above
- Setting up scheduled data refreshes
Follow- Refresh cycle
- Go to the respective workspace > semantic model > settings > Refresh
- Configure semantic model refresh
Set time zone, set frequency (weekly, daily, etc.), and recipient of failure notifications
- Refresh cycle
Now the report is scheduled to receive data updates in the specified frequency, at the specified time.
Note that, scheduled data updates are not included in free/standard PowerBI licenses and most likely require a PowerBI Professional license.
Also, as this is an external service provider, be aware, that the required licenses and this whole process may change in the future and may not be accurate anymore.
GET data into Google Looker Studio
After following all steps in this section, you will have one table in Looker Studio containing all requested elements with all properties.
Note: This approach uses Google Looker Studio, which offers freemium model. Restrictions may occur with api quotas or auto-refresh and might require a paid subscription.
Create an empty Google Sheet
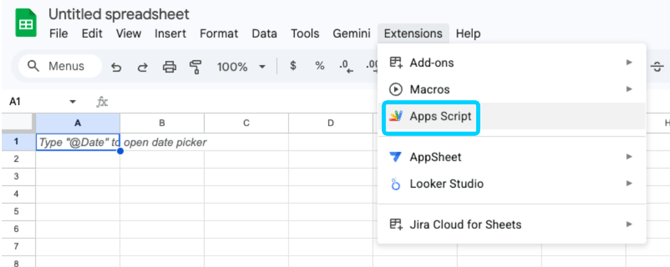
To GET the data into Looker Studio, start by creating a new blank Google Sheet using your professional account.
Next, navigate to Extension > Apps Script and open the script editor.
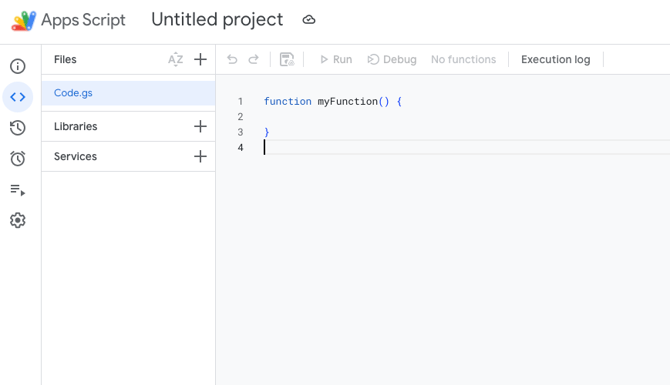
This will open a blank project in Apps Script:
In this step, you will need:
- API key (authorization key), see here
- URL of the OData API (URL column of the External Access tab)
- [Optional custom] Filter query - this defines the information that is to be requested
Now in the new project opened in Apps Script, follow these steps:
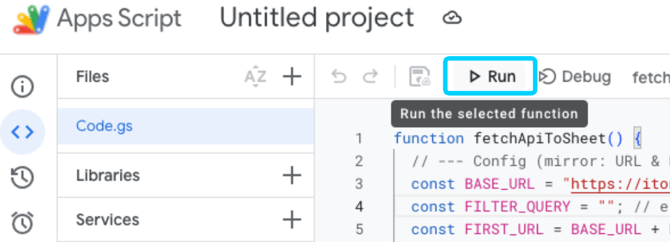
Past the following script to the code editor (make sure to insert your BASE URL and API KEY, and to change sheetName according to your preferences):function fetchApiToSheet() {
// --- Config (mirror: URL & FILTER_QUERY) ---
const BASE_URL = "{INSERT HERE YOUR URL of the OData API}";
const FILTER_QUERY = ""; // e.g. "?$filter=...&$top=200" (optional)
const FIRST_URL = BASE_URL + FILTER_QUERY;
// Prefer storing token in Script Properties:
// PropertiesService.getScriptProperties().setProperty("ITONICS_API_KEY", "...");
const token =
PropertiesService.getScriptProperties().getProperty("ITONICS_API_KEY") ||
"INSERT HERE YOUR API KEY";
const ss = SpreadsheetApp.getActive();
const sheetName = "api_data";
const sheet = ss.getSheetByName(sheetName) || ss.insertSheet(sheetName);
sheet.clear();
// --- 1) Pagination: fetch all pages ---
const allElements = [];
let nextUrl = FIRST_URL;
let safetyCounter = 0;
const MAX_PAGES = 1000; // safety guard
while (nextUrl && safetyCounter < MAX_PAGES) {
safetyCounter++;
const page = fetchPage_(nextUrl, token);
if (!page) break;
// Mirror PowerBI: elements + nextLink (but be tolerant to OData shapes)
const elements = page.elements || page.items || page.value || [];
if (Array.isArray(elements) && elements.length) {
allElements.push(...elements);
}
nextUrl = page.nextLink || page["@odata.nextLink"] || null;
}
if (!allElements.length) {
sheet.getRange(1, 1).setValue("No elements returned (or API shape mismatch).");
return;
}
// --- 2) ROBUST expansion: union of all keys across all rows ---
const headers = unionKeys_(allElements); // like AllColumnNames in PowerBI
sheet.getRange(1, 1, 1, headers.length).setValues([headers]);
// --- 3) Write rows ---
const rows = allElements.map(el =>
headers.map(h => normalizeCell_(el[h]))
);
sheet.getRange(2, 1, rows.length, headers.length).setValues(rows);
// Optional: basic formatting
sheet.setFrozenRows(1);
sheet.autoResizeColumns(1, headers.length);
}
/**
* Fetches a single page and returns parsed JSON.
*/
function fetchPage_(url, token) {
const res = UrlFetchApp.fetch(url, {
method: "get",
muteHttpExceptions: true,
headers: { Authorization: "ApiKey " + token }
});
const code = res.getResponseCode();
const text = res.getContentText();
if (code < 200 || code >= 300) {
// Write something helpful in logs for debugging
console.error("HTTP " + code + " for " + url + ": " + text);
return null;
}
try {
return JSON.parse(text);
} catch (e) {
console.error("JSON parse error for " + url + ": " + e + "\nBody:\n" + text);
return null;
}
}
/**
* Returns union of keys over all objects in the array (top-level only),
* matching the PowerBI "scan all rows" behavior.
*/
function unionKeys_(objects) {
const seen = new Set();
objects.forEach(obj => {
if (obj && typeof obj === "object" && !Array.isArray(obj)) {
Object.keys(obj).forEach(k => seen.add(k));
}
});
return Array.from(seen);
}
/**
* Makes values sheet-safe:
* - primitives stay as-is
* - objects/arrays become JSON strings
* - null/undefined -> empty cell
* - dates: if API gives ISO strings, you can leave them as string or parse (kept as string here)
*/
function normalizeCell_(value) {
if (value === null || value === undefined) return "";
const t = typeof value;
if (t === "string" || t === "number" || t === "boolean") return value;
// object/array -> JSON
try {
return JSON.stringify(value);
} catch (e) {
return String(value);
}
}
Parameters explanation:
- BASE URL
The URL which can be found in the External Access column in the ITONICS system. - FILTER_QUERY
Set the filter query to define what data will be requested, to just GET every element in the workspace, copy paste the text above. - API_KEY
URL and API key represent your authorization the ITONICS system, you will need to replace "INSERT HERE YOUR API KEY" in the script above, with your API key that you created and that is stored in the External Access settings.
The API key in the script could be something like this:A7fQ9mX2Zk04sB3NwC0EJt6DVaL1H3uP5YgKcM
Note: The resulting table will have all properties across all requested element types as unique columns, where each row represents an element. Be aware that, depending on the size of your workspace, this could be a lot.
It is also possible to split this table by element type if needed (prompt your favorite LLM if this is necessary).
- Run the script: Running the script fetches all elements from your specified work space, handles pagination, and normalizes the data into the spreadsheet.
You will see that your formerly empty Google Sheet will be filled with the extracted info: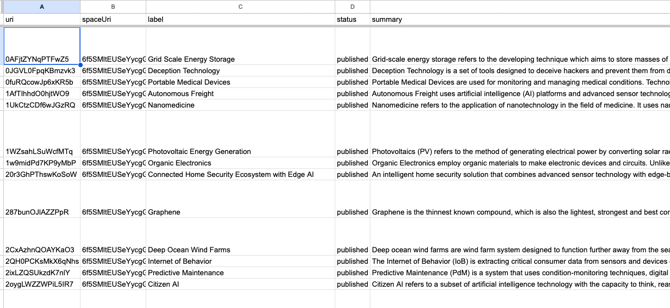
- Schedule the data update:
To keep the data updated, set up a trigger. Navigate to Triggers > Add Trigger :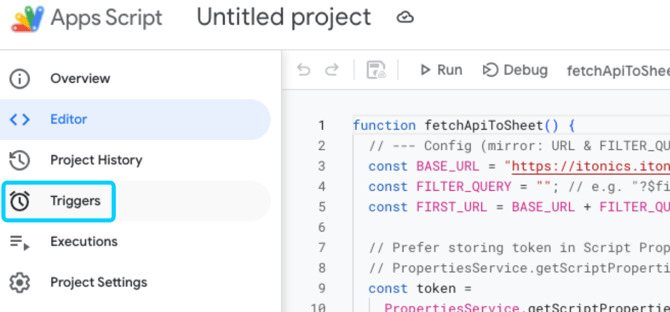
Set your desired trigger and Save (in the following example - a daily trigger updated at midnight):
- Connect to Looker Studio:
Open Looker Studio and create a Blank Report: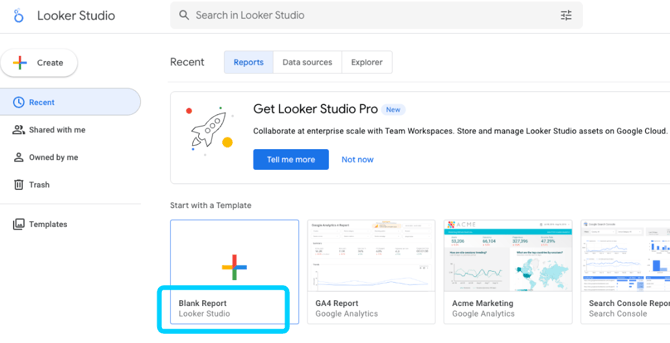
Choose Add data to report [1]> Google Sheets [2] and then select your file.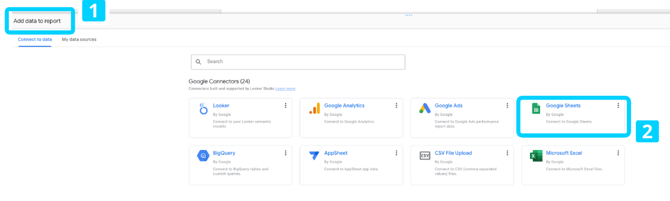
This will allow you to start drafting your BI reports with the extracted data.
Learn in the next section, how to embed this report into ITONICS.
Embed a Looker report into ITONICS
Embedding a report is as easy as pasting the report embed URL into the respective input field in the ITONICS Innovation OS.
Get an Embed URL from Looker Studio
To embed a report follow these steps:
- Share the report with the required personas
- The dashboard can be shared like a Google Doc, allowing invitation to specific email addresses. It is not a public link unless explicitly set.
- Get the embed URL
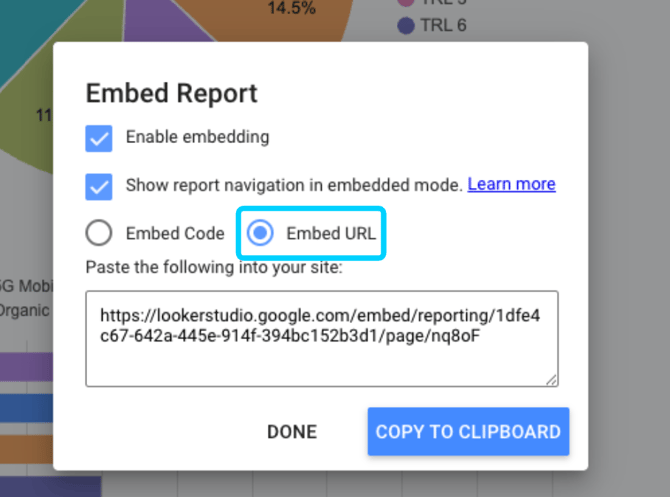
Click on File > Embed report and choose Embed URL: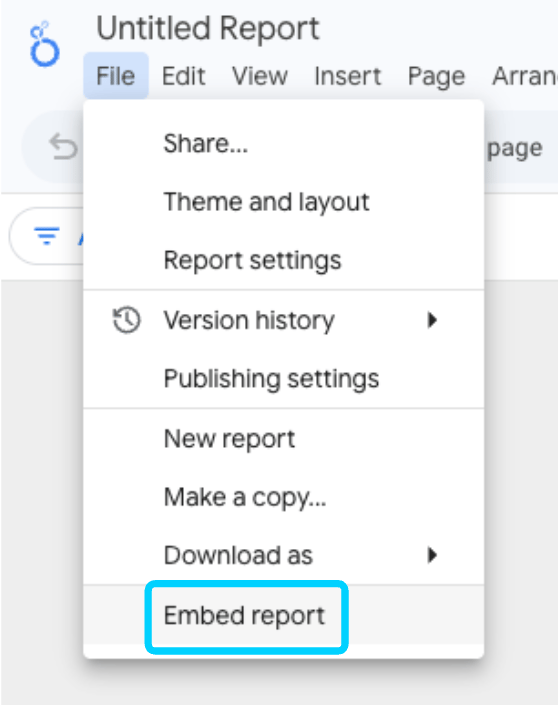
Note: As this is an external service provider, be aware, that the required licenses and this whole process may change in the future and may not be accurate anymore.
Embedding a report into ITONICS via report embed URL
Follow these steps closely.
- In ITONICS, go to the specific workspace where the report should be located in.
- Go to Report in the More Tools section
- Select Embed new report
- Enter a Report title
- Paste the Report URL (like:
https://lookerstudio.google.com/embed/reporting/[...]) - Press Embed Report
- Now the report should display.
- You will also find the option to "Make publicly available". When you share with everyone, every workspace user with permission granted to view embedded reports
finds the name of this saved view in their main menu under reports and can access it.
Note: Looker Studio reports can be access controlled, depending on your report configuration, users might have to log in to their respective Google account and to have viewer permissions to view a report.