- Editing content
- Explained: tags, categorizations, and ratings
- Relations — connect elements
- Comments — commenting, and tagging other users
- Rating content
- Collections — custom element lists
- Embed content from external tools — iframes
Please note that all the options mentioned below depend on how your Application Owner has configured the different element types. Read more about it here.
The availability of any option to you also depends on the role you have and whether you have the necessary edit permissions.
Edit content information
As content is the lifeblood of making any informed decision, the ITONICS Innovation OS helps you to structure the content intake and appropriate analysis as best as possible.
Your Application Owner will have configured for you what needs to be present on a content element to process it sufficiently and fast. There are different property options available by which the filtering, structuring, and display in the ITONICS tools are made possible.
To update the respective information, you just need to navigate to a content element. To enter a content element, you will have different options. As the easiest form, go to the Explorer and click on a content card [1]. To the right, a stack view will open [2].
You can also expand this view by clicking the first button to the upper left on the stack card (window resize icon) or the second button to the upper left (diagonal arrow icon) [3].
 With edit permission, you can now click on any text, and you will be able to update the respective information directly and in-line. Simply click in any field and select the value that you want to apply in a dropdown field, for instance [5].
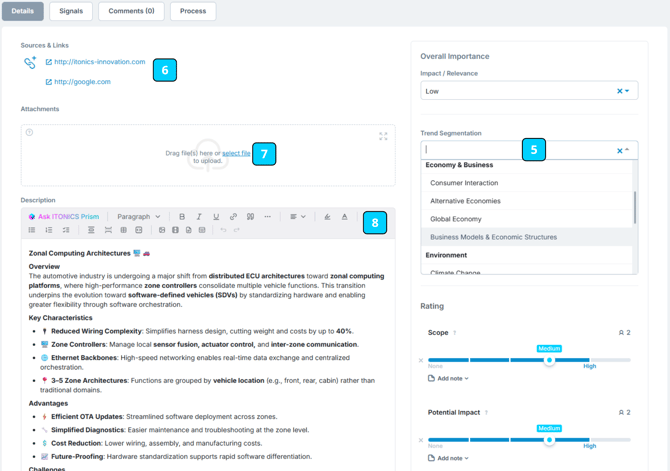
To add one or multiple reference(s), find the field with the link icon [6]. Hover over it and a pen will appear. Click on it, add your URL, and check the mark. When you want to add more references, hit the plus icon of the link icon. Now, a new line will appear where you can enter another URL. Just so you know, the last link added will always appear on top (and if configured in the header menu).
To upload an attachment, find the respective upload box and either drag and drop your file(s) into the zone or click on the blue-colored text to choose a file from your repository [7]. You can check all supported file types here.
When you engage with rich text (RTE) fields, you will find further text styling options once you click into the text [8]. This way, you can also embed content from other parties, e.g., a Miro Board or an ITONICS Radar.
To add an image, copy a single element to another workspace, convert an element to another element type, change its process step, or delete the element, navigate to the three dots next to the element status field and the watch icon [9].
You can also add this element to a collection [11].
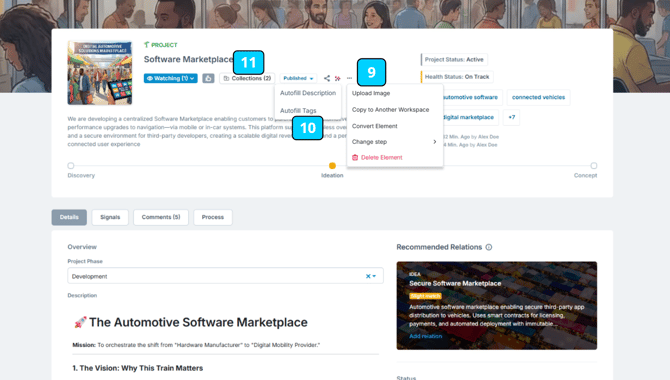
If licensed, you will find a further icon between the publication status and the three dots. The smart-actions icon will connect you with our bot which can automatically generate a description based on the elements summary, and title and auto-fill tags [10].
Tip: If you need to update multiple elements in bulk, you should navigate to the table view. Here, you can modify the display of the list to see the necessary categorial fields, rating fields, or user search fields. Click in a cell and directly update the information.
Keep in mind that unsaved changes to rich text fields will be stored locally on your device. If you accidentally close the window, for example, those unsaved changes will be waiting for you. Plus, note that the stored changes will not be available when opening the page on a different device or after clearing your local storage.
Difference between tags, categorizations, and ratings
You have the option to add keywords, i.e., tags, to any content element in the system. The tagging is not restricted to a list of options but can be added individually. They are, thus, different from a dropdown categorization with pre-defined values from which you can pick and choose or from rating values that result from the intakes of multiple users.
Tags, specifically, allow the addition of a specific categorization. Ideally, this enables you to identify uncommon or more specific patterns between all your content elements.
To add a tag, find the tag field in the main body or the right body. You have now three options:
- Add a new tag
- Start to add a tag by typing it into the text line [1]. The tag list of existing tags will adjust accordingly and you can see whether the same tag has been used already. If not, click on Add new Tag and the tag will be created [2].
- Find an existing tag
- Either browse through the list of available tags [2] or start typing into the text line [1]. If a text exists already, choose it from the list, and it will be applied to this content element.
- Generate tag suggestions
- Use the autofill option and the system will automatically create tag suggestions based on the title, summary, and other regular text fields [4]. A new model will open which includes the tag suggestions. If a tag does not match your requirements, delete it via the "x" icon. When satisfied with the selection, add the tags by hitting Insert [5].

Create and assign as many tags as necessary. The tags are used to show links in an element's network graphs, or as filter options.
Please note that the autofill tag feature requires a specific license. If you have a question, contact us at account_manager@itonics-innovation.com.
Relate other content elements
The ITONICS Innovation OS aims to connect the dots. To connect the dots, building relations between your content is key. The system also comes with a recommender system, i.e., recommended relations, that helps you to easily connect the dots.
After you create a new element within your workspace, or if you want to enrich an existing element, navigate to the stack view or the detail page of the respective element. If configured by your Application Owner, you will find two sections.
Recommended Relations
In the widget, all elements that show similarities to the respective element will be displayed [1]. You can then look through the recommendations by clicking on the arrow icons [2] or slider at the bottom [3]. However, the widget will also automatically slide through and show the content recommendations in a rotation.
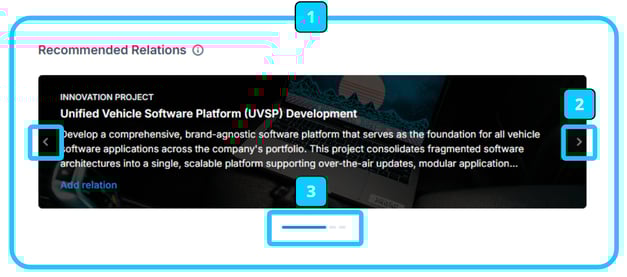
By clicking on the title you can open the respective element in the stack and assess whether a recommendation is relevant. Click on the Add relation button to add the recommended element as a new relation to the current element. You will then receive a pop-up message confirming that the relation has successfully been added.
Note: All recommended relations will by default be added with the relation type relates to. To further categorize the relation, check the text below on relations
Tip: Recommended relations are based on a recommender engine that utilizes all content within your workspace to create recommendations. The recommender engine uses machine learning techniques to compute a similarity score between your specific element and all other elements within the respective workspace. In the end, based on the calculated scores, the recommender engine returns the top elements that have the highest similarity to your specific element.
Tip: As the recommended relations are formed based on the textual data of the summary, ITONICS recommends having descriptive element summaries that utilize the main keywords describing the element to increase the likelihood of good recommended relations.
Relations
The relations section lists all your made relations between this content element and other content elements.
The related elements are displayed in a random order. You can choose between the list view and the network graph view [4]. In the list view, all related elements are listed by element type, the title, and the beginning of the summary. Further, the relation type is shown [5].

When you want to add a new relation, scroll to the bottom of the view and type in or scroll through the list of all available elements from your workspace. You have the option to categorize the relationship via the available options [6].
Note that you cannot change the relation type once it has been created. If you want to change it, you need to delete the relationship by clicking the X and re-establish the relationship.
Visualizing relations — network graph
Change the view to the network graph view [4][9]. Relations are now displayed visibly, color indicates element types, as defined in the element configuration.
Besides direct relations, i.e., a relation that is set between two content elements, the graph also visualizes second-level relations, i.e., potentially interesting relations that emerge because already related content has relations with other content elements [10].
To make this more visible, you can manipulate the settings [11].

By changing the sliders, you can define how big the dots of the first-line relation and the second-line relation should appear. The same can be applied to the distance level between the elements of the first- and second-level.
Commenting and tagging other users
To unlock interest, drive meaningful conversations, and inform relevant co-workers, you can find a comment functionality on each content element (if configured by your Application Owner). When you are on the stack view element page or the detail view, you will find a separate comment tab. Click on it, find all the comments made, and start adding your comments or replying to comments.
The last comment made will be shown on the top, and here you find the option to add your comment. Write your comment and click on Save.

You can also respond to comments by using the thumbs-up icon below the comment. When clicking the thumbs-up, six different emojis appear from which you can choose. When you react with an emoji, the comment writer receives an email notification, informing him/her about the reaction. Plus, the names of the emoji reactors are shown when you hover over the emoji.
By putting "@" within your comment, you will find a list of all users from the workspace. This way, you can tag colleagues and ask for their opinions, for instance.
If you want to refer to a particular content element, use "#" and select the content element. The content element from the workspace will be added and a link provided to enter easily this element
To reply to a comment, go to the respective comment and hit "Reply".
You can also change the look and feel of a comment by using different formatting options. Available options are: numbered lists, bulleted lists, text style (Bold, Italics, Underline), text color, text background color, hyperlinks, and image upload.
All the user roles except Viewer can comment on an element. Viewer can only read the comments. Check the permission table to learn more about editing and deleting comments (be aware, that custom permissions for roles can be set, depending on your configuration, viewers could be able to comment too).
Rate content
Click on a content element where your Application Admin has configured rating criteria. To understand how you can access a content element stack view or detail view, check this article.
Scroll down to the rating section of the opened trend card. Click on the rating sliders for the value that you believe best represents your opinion. The rating value will be saved and once successful, you will see the counter to the top right of any criteria will go up.
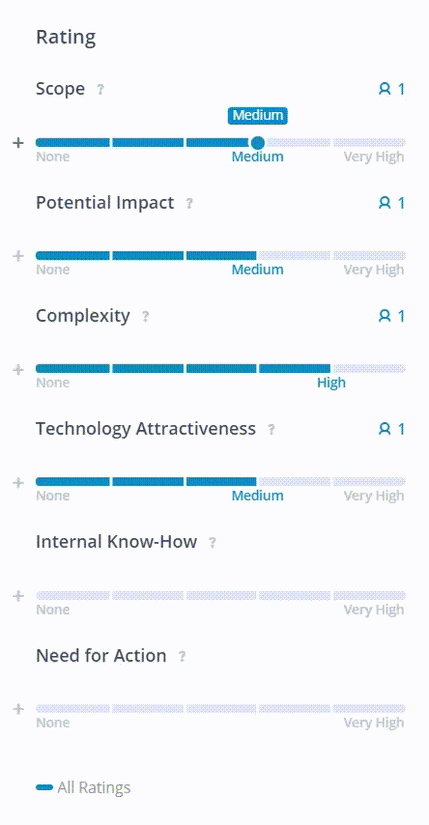
When you submit your rating [1], you will also find the option below the rating criteria to add a rating note [2]. The textbox provides you with the option to explain your rating. There is a 250-character limit for the note. The characters consumed are displayed at the bottom right of the text box [3]. Save your note by the tick or delete it with the X button.
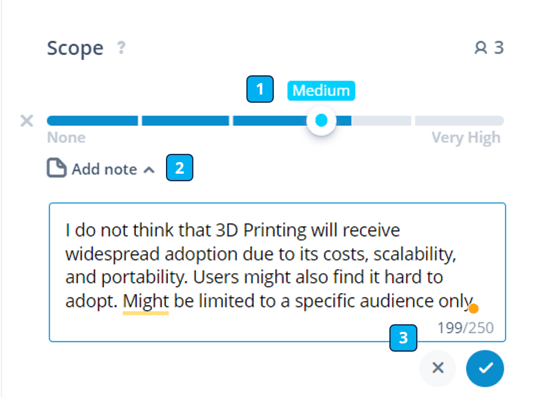
All the rating notes from all evaluators will be displayed alongside the rating value under "manage ratings".
When you want to change your evaluation, simply click on another value on the rating slider. Besides your rating which is shown by a dot on a slider, also the arithmetic mean is shown by the blue bar.
If enabled, ITONICS also provides a rating aggregation feature. With this feature, your workspace admin can define a calculation among multiple rating criteria. The aggregated rating will be indicated by a sum sign. By hovering over the sum sign, users can understand the calculation formula.

If enabled, ITONICS also provides an automatically filled score (from "none" to "very high"), called Speed of Change, which holds an aggregation of the growth rate of news, patents, and publications related to the element. To cover a short and mid-period of time, ITONICS provides two smart scores with different time ranges: Speed of Change [90 Days] and Speed of Change [180 Days].
Tip: When you want to evaluate multiple content elements in a row, use our list feature. All content elements will be displayed as rows and - if configured - will show all the rating criteria as columns.
Collections
Collections are lists of elements, they enable storing and representing elements not by a filter, but by a simple element list.
If you want to enable your users to make use of collections effectively, ITONICS recommends to create a "Collections" folder, where public and unlisted (only visible to the creator) collections can be stored in views (make sure to set a view as private if you want to store a unlisted/personal collection)
Adding an element to a collection
- Go to the element detail page and press on the Collections button in the header
- Select an existing collection or create a new one by typing a name in the search bar.
- When creating a new collection, set its visibility
- Public: everyone can see, edit, and add elements to this collection
- Unlisted: none can edit, or add elements to this collection
- When creating a new collection, set its visibility
- Now this element is part of this collection and the it can be selected in the global filter section and can therefore also be represented by a view if needed.
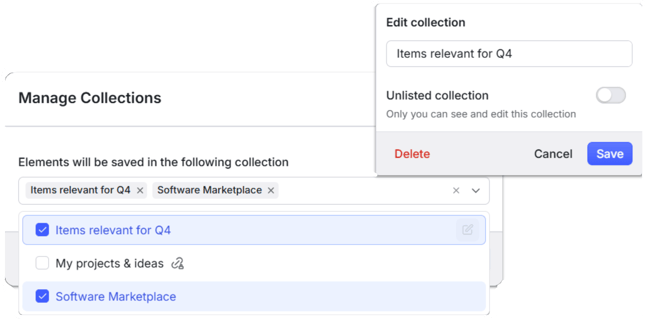
Note that as indicated by the name "unlisted", unlisted collections can still be attached to public views by their creator and their associated elements can therefore be seen.
Unlisted does not mean private.
Embed content from external tools
If you want to use 3rd party tools within the ITONICS platform, you can easily do so by embedding them with iframe in rich text fields.
Example: You want to use Miro to perform a brainstorming session with colleagues. (this of course works with every 3rd party tool that offers an <iframe> code)
- Navigate to the detail page of an element, that has a rich text property.
- Click on the rich text field to open the edit mode.
- Click on the world icon in the toolbar of the rich text editor (1).
- Copy the embed code into the input field (2).

- Adjust the size of the iframe (see 3 below).
- Select Interacting with iFrame (see 4 below) to adjust the content that will be displayed.
- Save the changes.
You can now interact with the iFrame and start with the brainstorming session.
Potential 3rd party tools that you can embed via iframe: Miro, Mural, ITONICS Radar or Roadmap, Youtube, Vimeo, Google Docs / Slides / Sheets / Forms, Microsoft Forms