|
Single content intake options |
Bulk content intake options |
Please note that you need the respective create permission in a workspace to perform the actions described in this article.
Create Button
To add content pieces via the create button, find it close to the top of the left main navigation menu. Click the Create button. Now, a modal opens and you can choose between creating an element from scratch by selecting the right type that best categorizes what you want to create, importing elements via excel (see excel import), copying elements from another workspace or configuring new element types or editing your existing ones. This list of options has been defined by your Workspace Administrator, you might not see all options if you lack premisions.

If you want to create a single element, choose the right content category from the selection by clicking on the right label. Now another popup appears and you can start adding information. Finish the creation process by clicking either the Publish button (all users will then be allowed to see the content piece directly) or use the Save as Draft button to save the element in a draft version that you can choose to publish at a later stage. You can also immediately create another element by making use of the Create Another checkbox option, or [Alt + Enter] hotkey combination.
Once done, you can add more information to the created content card.
💡 What Makes a Content Piece Find Interest
As described, content is the lifeblood of the ITONICS Innovation OS. Here are some tips to keep in mind when creating content:
- Use concise language for the title and summary, in particular, to ease the understanding for other users and get meaningful results in the Signals Feed.
- Add sources, references, and attachments to underpin your argument with facts, figures, and evidence.
- Add tags to the content and fill out the dropdown menus, so that your colleagues can more easily find the content they are looking for, e.g. using the Tag Filter Visualization.
- Relate the element to others in the system. This will help you and others to connect the dots and identify opportunities.
- Use illustrative images, videos, or screenshots (and all the other style options) in the Rich Text Field to convey a strong and engaging message.
Clip pages from the Web
The Webclipper is a browser extension. It allows you to capture pages from the Web while browsing and clip those to your private clippings folder. You can then decide how, with whom, and in which workspace you want to share it.

Read this article to learn how to install the browser extension and how to use it.
Add content from Insights and the Signals Feed
When you make use of the huge ITONICS Data Lake to scout for interesting content pieces (outside of the content that you have already stored in your Innovation OS), you have the option to add any interesting content piece from the feeds to your system.
Either in Insights [1] or on the Signals Feed of a particular content element, click on the respective content piece [2]. It now opens in the right sidebar. Besides the title, summary, source, and country, you will find the blue Create button [3].

Click on it and the content creation modal will open. You can now decide on the content element type that best represents the content piece. Further, you can directly take over the information for the title and the summary or modify it. Once done, click publish to add it to your database [4].
Add Activities to the Roadmap
To add an activity to a roadmap, navigate to a respective roadmap. You will find it from the main navigation menu on the left, just under "Create" [1], you might have to click on "More Tools" and then by selecting one of the available roadmaps.

When you enter the roadmap, you will find the Create button in the bottom right corner [2]. Hover over it and either create a completely new activity by clicking Create Activity or copy an existing activity from another roadmap into this roadmap by clicking Add Existing Activity.
Once clicked, a new modal opens where you can fill in the needed activity information [3]. Mandatory fields are marked by an asterisk. When you are satisfied, hit Create Activity [4].
You can read more on using the roadmap here.
XLS-Import File
To intake content in bulk, you can make use of the spreadsheet import feature.
The import feature is available from any tool (except for Insights and Roadmap). For instance, go to the Explorer and find the three dots next to the title of your view [1].
Click on the three dots and select Import from Excel [2] (or press on the Import Content button if your workspace is still empty).
 The import consists of three simple steps:
- Choose the element type you want to import and download your template. (3)
- Fill the template with your data. Please make sure to provide the data in the correct format. Find more tips on the Excel import here. (4)
- Upload your file using drag and drop or select from your file manager, and click on Check file. (5)
Once the file is validated, you can upload your elements.

You can also combine the import feature with the export feature to bulk edit content. Learn more about this option in this article.
Copy content from the ITONICS Showroom (or any other workspace)
When you already have content in your Innovation OS, you can easily copy this content from one Workspace to another Workspace (where you, of course, have the rights to create content). This also applies to content coming from the ITONICS Showroom.
The ITONICS Showroom is a specific, non-editable workspace provided by ITONICS. The ITONICS Showroom comes with curated content from the ITONICS Analyst team. It consists of curated trends, technologies, and inspirations. You cannot create or edit any content in the Showroom, but you can copy the content into your own workspaces to work with it.
To navigate to the ITONICS Showroom, go to the top left corner of your application, click on the name of the workspace you are currently in, and switch it to ITONICS Showroom.
Our Analyst team has also created specific filters and views that should help you navigate the Showroom quickly. Just explore the bookmark icon at the top and select any relevant view.
When you discover something of interest, just hover over the content card and find a checkbox to the top left of the card [1]. Select it, and a second menu opens from which you can copy this element with the evaluations of the ITONICS analyst team into your workspace [2]. The same also applies when you want to copy content from one workspace to another.
You can select as many elements as you want or directly use a select all when you click the "-" icon, first of the modal at the bottom [2].
 Next, a new modal opens where you can decide to which workspace the content should be copied [3]. This is a single select option, so you can only copy content to one other workspace at once. If you want to copy the same content to multiple workspaces, you need to re-run the process.
You can also decide whether you want to overwrite information that might already exist, as the content element might have been copied earlier. Yet, ratings and comments will be kept in the source. Once satisfied, finish the copy process by clicking "copy".
Please note the following:
- After copying elements that already have ratings to another workspace, only the average rating value will be copied over. These copied ratings will also be marked as such in grey. As soon as you or a colleague adds your own rating in the target workspace, the average from the source workspace will be overwritten, and the slider value will change to blue.
- When force copying elements, most information will be overwritten in the workspace you are copying to except for: Ratings and Comments
- Please note that for copying content, the same element type - ITONICS Blueprint: trend, technology, or inspiration - needs to be enabled in the respective workspace as well [3]. If any modifications have been made to the element type (such as adding, editing, or removing properties), it will cause incompatibility, and the copying mechanism will not function as intended.
The Duplicate detector
The duplicate detector is designed to prevent you from producing duplicate content before you add it to your Innovation OS. It ensures more efficient and organized content within your workspace and is most beneficial if you have a lot of elements to manage.
When you create a new content element in your workspace, you will be prompted to enter a title for that element. As you type in the title, a search function is automatically triggered. This search function compares the title you are entering to the titles of other elements already within the same workspace of the same element type [1].
The search will return all elements that show semantic similarities. The same words or parts of words between the title you are entering, and the existing elements, will be highlighted in bold letters for easy identification. You can then directly jump to any of the elements returned by the search by clicking on a small arrow on the right of the element. This will open a new tab, allowing you to view the existing element [2].
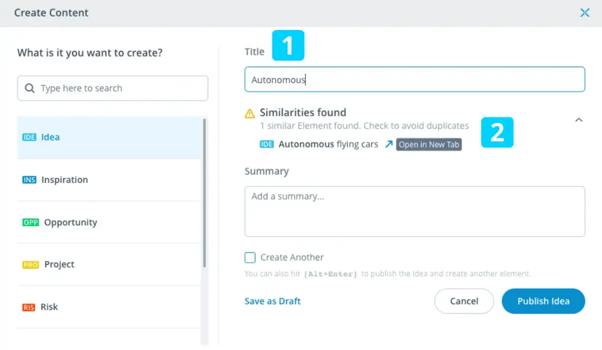
You can now decide whether you were in the process of creating a duplicate. If so, you can simply abort the creation process. Otherwise, you can jump back to the original tab and continue with the creation of the new element.
Additionally, you can ask Prism to identify if there there already is an element about that topic.
On the topic of duplication, you can also duplicate a view and personalize it to your own needs.
Submit an idea to a campaign
If you have a valuable idea that matches the context of a campaign, you can easily create your idea in just a few clicks.
Follow these steps to create and directly submit your idea to a campaign:
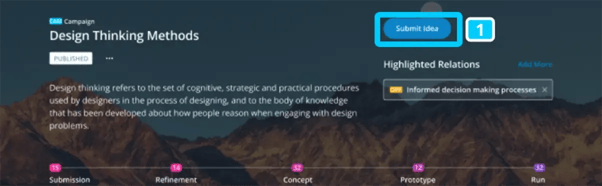
- Go to a campaign detail page. You can use the filter in order to find running campaigns.
- Click Submit Idea (1).
- Fill out the idea form with information on Title and Summary in the modal (2).
- Click Publish Idea (3) or Save as Draft (4).

Once the idea has been created, you can add more information, like a detailed description or any other information that is relevant for your idea in the context of the campaign.
Note: If you click the Save as Draft button in the idea creation modal, you create your idea without necessarily filling out all information already and not making the idea publicly available to all users (check out the permission configuration of your workspace to find out which user roles can view draft elements).
Auto-generate ideas for a campaign
Once you have started an idea campaign you can leverage the power of generative AI to generate some thought starter ideas.
Click on the Smart Actions in the Campaign header and select Autocreate Ideas [1].
A modal will come up and will ask for more context to generate the best ideas possible: In which industry should the ideas primarily be applied? Who will benefit most from it (target audience)? Hit Create [2] once you have provided the relevant information. Click on Explore now once the ideas are created.
You will be redirected to the Campaign Board to check out the AI-created ideas.

To learn more about campaigns, read this article.
Auto-create trend and technology radars
Find further, more thorough instructions in this article.
To create any radar with AI assistance, navigate to the plus icon in the left navigation menu bar, it is located just above your folders and views.
Choose, create a new view and select "radar".
Once the view is created, all you have to do is select the element type you want to visualize on the radar, find an appropriate filter to include only the elements you want, and choose a property to segment by and a property to show distance by.
After that is done, you can ask PRISM, the AI chatbot, to segment your existing elements of the element type you are visualizing and you can also ask PRISM to rate your elements to get the correct distancing.
PRISM is also helpful to answer any questions that arise on the way, just ask away.